· 2 min read

This is a step by step example on how to start using Python with ClickHouse Cloud service.

note

Keep in mind that Python versions and libraries dependencies are constantly evolving. Make also sure to use the latest supported versions of both the driver and Python environment when trying this.

At the time of writing this article, we're using the clickhouse-connect driver version 0.5.23 and python 3.11.2 respectively.

Steps

  1. Check the Python version:
$  python -V
Python 3.11.2
  1. We'll assemble the project in a folder called ch-python:
$ mkdir ch-python
$ cd ch-python
  1. Create a dependencies file named requirements.txt with:
clickhouse-connect==0.5.23
  1. Create a python source file named main.py:
import clickhouse_connect
import sys
import json

CLICKHOUSE_CLOUD_HOSTNAME = 'HOSTNAME.clickhouse.cloud'
CLICKHOUSE_CLOUD_USER = 'default'
CLICKHOUSE_CLOUD_PASSWORD = 'YOUR_SECRET_PASSWORD'

client = clickhouse_connect.get_client(
host=CLICKHOUSE_CLOUD_HOSTNAME, port=8443, username=CLICKHOUSE_CLOUD_USER, password=CLICKHOUSE_CLOUD_PASSWORD)

print("connected to " + CLICKHOUSE_CLOUD_HOSTNAME + "\n")
client.command(
'CREATE TABLE IF NOT EXISTS new_table (key UInt32, value String, metric Float64) ENGINE MergeTree ORDER BY key')

print("table new_table created or exists already!\n")

row1 = [1000, 'String Value 1000', 5.233]
row2 = [2000, 'String Value 2000', -107.04]
data = [row1, row2]
client.insert('new_table', data, column_names=['key', 'value', 'metric'])

print("written 2 rows to table new_table\n")

QUERY = "SELECT max(key), avg(metric) FROM new_table"

result = client.query(QUERY)

sys.stdout.write("query: ["+QUERY + "] returns:\n\n")
print(result.result_rows)
  1. Create the virtual environment:
chpython$ python -m venv venv
  1. Load the virtual environment:
chpython$ source venv/bin/activate

Once loaded, your terminal prompt should be prefixed with (venv), install dependencies:

(venv) ➜  chpython$ pip install -r requirements.txt
Collecting certifi
Using cached certifi-2023.5.7-py3-none-any.whl (156 kB)
Collecting urllib3>=1.26
Using cached urllib3-2.0.2-py3-none-any.whl (123 kB)
Collecting pytz
Using cached pytz-2023.3-py2.py3-none-any.whl (502 kB)
Collecting zstandard
Using cached zstandard-0.21.0-cp311-cp311-macosx_11_0_arm64.whl (364 kB)
Collecting lz4
Using cached lz4-4.3.2-cp311-cp311-macosx_11_0_arm64.whl (212 kB)
Installing collected packages: pytz, zstandard, urllib3, lz4, certifi, clickhouse-connect
Successfully installed certifi-2023.5.7 clickhouse-connect-0.5.23 lz4-4.3.2 pytz-2023.3 urllib3-2.0.2 zstandard-0.21.0
  1. Launch the code!
(venv) chpython$ venv/bin/python main.py

connected to HOSTNAME.clickhouse.cloud

table new_table created or exists already!

written 2 rows to table new_table

query: [SELECT max(key), avg(metric) FROM new_table] returns:

[(2000, -50.9035)]
tip

If using an older Python version (e.g. 3.9.6) you might be getting an ImportError related to urllib3 library. In that case either upgrade your Python environment to a newer version or pin the urllib3 version to 1.26.15 in your requirements.txt file.
· 5 min read

How can I use API to manage clusters on ClickHouse Cloud?

Answer

We will use Terraform to configure our infra and ClickHouse Provider

Steps:

1). Create an API Key on Cloud. Follow the docs here - https://clickhouse.com/docs/en/cloud/manage/openapi

Save the creds locally.

2). Install Terraform using - https://developer.hashicorp.com/terraform/tutorials/aws-get-started/install-cli

You can use Homebrew package manager if you're on Mac.

3). Create a directory anywhere you like:

mkdir test
➜ test pwd
/Users/jaijhala/Desktop/terraform/test

4). Create 2 files: main.tf and secret.tfvars

Copy the following:

main.tf file would be:

terraform {
required_providers {
clickhouse = {
source = "ClickHouse/clickhouse"
version = "0.0.2"
}
}
}

variable "organization_id" {
type = string
}

variable "token_key" {
type = string
}

variable "token_secret" {
type = string
}

provider clickhouse {
environment = "production"
organization_id = var.organization_id
token_key = var.token_key
token_secret = var.token_secret
}


variable "service_password" {
type = string
sensitive = true
}

resource "clickhouse_service" "service123" {
name = "jai-terraform"
cloud_provider = "aws"
region = "us-east-2"
tier = "development"
idle_scaling = true
password = var.service_password
ip_access = [
{
source = "0.0.0.0/0"
description = "Anywhere"
}
]
}

output "CLICKHOUSE_HOST" {
value = clickhouse_service.service123.endpoints.0.host
}

You can replace your own parameters like service name, region etc.. in the resources section above.

secret.tfvars is where you'll put all the API Key related info that you downloaded earlier. The idea behind this file is that all your secret credentials will be hidden from the main config file.

It would be something like (replace these parameters):

organization_id = "e957a5f7-4qe3-4b05-ad5a-d02b2dcd0593"
token_key = "QWhhkMeytqQruTeKg"
token_secret = "4b1dNmjWdLUno9lXxmKvSUcPP62jvn7irkuZPbY"
service_password = "password123!"

5). Run terraform init from this directory

Expected output:

Initializing the backend...

Initializing provider plugins...
- Finding clickhouse/clickhouse versions matching "0.0.2"...
- Installing clickhouse/clickhouse v0.0.2...
- Installed clickhouse/clickhouse v0.0.2 (self-signed, key ID D7089EE5C6A92ED1)

Partner and community providers are signed by their developers.
If you'd like to know more about provider signing, you can read about it here:
https://www.terraform.io/docs/cli/plugins/signing.html

Terraform has created a lock file .terraform.lock.hcl to record the provider
selections it made above. Include this file in your version control repository
so that Terraform can guarantee to make the same selections by default when
you run "terraform init" in the future.

Terraform has been successfully initialized!

You may now begin working with Terraform. Try running "terraform plan" to see
any changes that are required for your infrastructure. All Terraform commands
should now work.

If you ever set or change modules or backend configuration for Terraform,
rerun this command to reinitialize your working directory. If you forget, other
commands will detect it and remind you to do so if necessary.

6). Run terraform apply -var-file=secret.tfvars command.

Something like:

➜  test terraform apply -var-file=secret.tfvars

Terraform used the selected providers to generate the following execution plan. Resource actions are indicated with
the following symbols:
+ create

Terraform will perform the following actions:

# clickhouse_service.service123 will be created
+ resource "clickhouse_service" "service123" {
+ cloud_provider = "aws"
+ endpoints = (known after apply)
+ id = (known after apply)
+ idle_scaling = true
+ ip_access = [
+ {
+ description = "Anywhere"
+ source = "0.0.0.0/0"
},
]
+ last_updated = (known after apply)
+ name = "jai-terraform"
+ password = (sensitive value)
+ region = "us-east-2"
+ tier = "development"
}

Plan: 1 to add, 0 to change, 0 to destroy.

Changes to Outputs:
+ CLICKHOUSE_HOST = (known after apply)

Do you want to perform these actions?
Terraform will perform the actions described above.
Only 'yes' will be accepted to approve.

Enter a value: yes

Type yes and hit enter

Side note: Notice it says password = (sensitive value) above. This is because we set sensitive = true for the password in the main.tf file.

7). It will take a couple of mins to create the service but eventually it should come up like:

  Enter a value: yes

clickhouse_service.service123: Creating...
clickhouse_service.service123: Still creating... [10s elapsed]
clickhouse_service.service123: Still creating... [20s elapsed]
clickhouse_service.service123: Still creating... [30s elapsed]
clickhouse_service.service123: Still creating... [40s elapsed]
clickhouse_service.service123: Still creating... [50s elapsed]
clickhouse_service.service123: Still creating... [1m0s elapsed]
clickhouse_service.service123: Still creating... [1m10s elapsed]
clickhouse_service.service123: Still creating... [1m20s elapsed]
clickhouse_service.service123: Still creating... [1m30s elapsed]
clickhouse_service.service123: Still creating... [1m40s elapsed]
clickhouse_service.service123: Creation complete after 1m41s [id=aa8d8d63-1878-4600-8470-630715af38ed]

Apply complete! Resources: 1 added, 0 changed, 0 destroyed.

Outputs:

CLICKHOUSE_HOST = "h3ljlaqez6.us-east-2.aws.clickhouse.cloud"
➜ test

8). Check Cloud Console, you should be able to see the service created.

9). To clean up/destroy the service again, run terraform destroy -var-file=secret.tfvars

Something like:

Terraform used the selected providers to generate the following execution plan. Resource actions are indicated with
the following symbols:
- destroy

Terraform will perform the following actions:

# clickhouse_service.service123 will be destroyed
- resource "clickhouse_service" "service123" {
- cloud_provider = "aws" -> null
- ............

Plan: 0 to add, 0 to change, 1 to destroy.

Changes to Outputs:
- CLICKHOUSE_HOST = "h3ljlaqez6.us-east-2.aws.clickhouse.cloud" -> null

Do you really want to destroy all resources?
Terraform will destroy all your managed infrastructure, as shown above.
There is no undo. Only 'yes' will be accepted to confirm.

Enter a value:

Type yes and hit enter

10).

clickhouse_service.service123: Destroying... [id=aa8d8d63-1878-4600-8470-630715af38ed]
clickhouse_service.service123: Still destroying... [id=aa8d8d63-1878-4600-8470-630715af38ed, 10s elapsed]
clickhouse_service.service123: Still destroying... [id=aa8d8d63-1878-4600-8470-630715af38ed, 20s elapsed]
clickhouse_service.service123: Destruction complete after 27s

Destroy complete! Resources: 1 destroyed.

And it should be gone from the Cloud Console.

More details about the Cloud API can be found here - https://clickhouse.com/docs/en/cloud/manage/api/api-overview

· 4 min read

Question

If I have varying attributes in a column using map types, how can I extract them and use them in queries?

Answer

This is a basic example of extracting keys and values from a variable attributes field. This method will create seemingly duplicates from each row in the source/raw table. Due to the keys and values being extracted, however, they can be put into the Primary Key or a secondary with an index, such as a bloom filter.

In this example, we basically have a source that creates a metrics table, it has multiple attributes that can apply in an attributes field that has maps. If there are attributes that will always be present for records, it is better to pull those out into their own columns and populate.

You should be able to just copy and paste to see what the outputs would be and what the materialized view does in this instance.

Create a sample database:

create database db1;

Create the initial table that will have the rows and attributes:

create table db1.table1_metric_map
(
id UInt32,
timestamp DateTime,
metric_name String,
metric_value Int32,
attributes Map(String, String)
)
engine = MergeTree()
order by timestamp;

Insert sample rows into the table. The sample size is intentionally small so that when the materialized view is created, you can see how the rows are multiplied for each attribute.

insert into db1.table1_metric_map
VALUES
(1, '2023-09-20 00:01:00', 'ABC', 10, {'env':'prod','app':'app1','server':'server1'}),
(2, '2023-09-20 00:01:00', 'ABC', 20,{'env':'prod','app':'app2','server':'server1','dc':'dc1'}),
(3, '2023-09-20 00:01:00', 'ABC', 30,{'env':'qa','app':'app1','server':'server1'}),
(4, '2023-09-20 00:01:00', 'ABC', 40,{'env':'qa','app':'app2','server':'server1','dc':'dc1'}),
(5, '2023-09-20 00:01:00', 'DEF', 50,{'env':'prod','app':'app1','server':'server2'}),
(6, '2023-09-20 00:01:00', 'DEF', 60, {'env':'prod','app':'app2','server':'server1'}),
(7, '2023-09-20 00:01:00', 'DEF', 70,{'env':'qa','app':'app1','server':'server1'}),
(8, '2023-09-20 00:01:00', 'DEF', 80,{'env':'qa','app':'app2','server':'server1'}),
(9, '2023-09-20 00:02:00', 'ABC', 90,{'env':'prod','app':'app1','server':'server1'}),
(10, '2023-09-20 00:02:00', 'ABC', 100,{'env':'prod','app':'app1','server':'server2'}),
(11, '2023-09-20 00:02:00', 'ABC', 110,{'env':'qa','app':'app1','server':'server1'}),
(12, '2023-09-20 00:02:00', 'ABC', 120,{'env':'qa','app':'app1','server':'server1'}),
(13, '2023-09-20 00:02:00', 'DEF', 130,{'env':'prod','app':'app1','server':'server1'}),
(14, '2023-09-20 00:02:00', 'DEF', 140,{'env':'prod','app':'app2','server':'server1','dc':'dc1'}),
(15, '2023-09-20 00:02:00', 'DEF', 150,{'env':'qa','app':'app1','server':'server2'}),
(16, '2023-09-20 00:02:00', 'DEF', 160,{'env':'qa','app':'app1','server':'server1','dc':'dc1'}),
(17, '2023-09-20 00:03:00', 'ABC', 170,{'env':'prod','app':'app1','server':'server1'}),
(18, '2023-09-20 00:03:00', 'ABC', 180,{'env':'prod','app':'app1','server':'server1'}),
(19, '2023-09-20 00:03:00', 'ABC', 190,{'env':'qa','app':'app1','server':'server1'}),
(20, '2023-09-20 00:03:00', 'ABC', 200,{'env':'qa','app':'app1','server':'server2'}),
(21, '2023-09-20 00:03:00', 'DEF', 210,{'env':'prod','app':'app1','server':'server1'}),
(22, '2023-09-20 00:03:00', 'DEF', 220,{'env':'prod','app':'app1','server':'server1'}),
(23, '2023-09-20 00:03:00', 'DEF', 230,{'env':'qa','app':'app1','server':'server1'}),
(24, '2023-09-20 00:03:00', 'DEF', 240,{'env':'qa','app':'app1','server':'server1'});

We can then create a materialized view with array join so that it can extract the map attributes onto keys and values columns. For demonstration, in the example below, it uses an implicit table (with the POPULATE command, and backing table like .inner.{uuid}... ). The recommended best practice, however, is to use an explicit table where you wouldd define the table first, then create a materialized view on top with the TO command instead.

CREATE MATERIALIZED VIEW db1.table1_metric_map_mv
ORDER BY id
POPULATE AS
select
*,
attributes.keys as attribute_keys,
attributes.values as attribute_values
from db1.table1_metric_map
array join attributes
where notEmpty(attributes.keys);

The new table will have more rows and will have the keys extracted, like this:

SELECT *
FROM db1.table1_metric_map_mv
LIMIT 5

Query id: b7384381-53af-4e3e-bc54-871f61c033a6

┌─id─┬───────────timestamp─┬─metric_name─┬─metric_value─┬─attributes───────────┬─attribute_keys─┬─attribute_values─┐
│ 1 │ 2023-09-20 00:01:00 │ ABC │ 10 │ ('env','prod') │ env │ prod │
│ 1 │ 2023-09-20 00:01:00 │ ABC │ 10 │ ('app','app1') │ app │ app1 │
│ 1 │ 2023-09-20 00:01:00 │ ABC │ 10 │ ('server','server1') │ server │ server1 │
│ 2 │ 2023-09-20 00:01:00 │ ABC │ 20 │ ('env','prod') │ env │ prod │
│ 2 │ 2023-09-20 00:01:00 │ ABC │ 20 │ ('app','app2') │ app │ app2 │
└────┴─────────────────────┴─────────────┴──────────────┴──────────────────────┴────────────────┴──────────────────┘

From here, in order to query for your rows that need certain attributes, you would do something like this:

SELECT
t1_app.id AS id,
timestamp,
metric_name,
metric_value
FROM
(
SELECT *
FROM db1.table1_metric_map_mv
WHERE (attribute_keys = 'app') AND (attribute_values = 'app1') AND (metric_name = 'ABC')
) AS t1_app
INNER JOIN
(
SELECT *
FROM db1.table1_metric_map_mv
WHERE (attribute_keys = 'server') AND (attribute_values = 'server1')
) AS t2_server ON t1_app.id = t2_server.id

Query id: 72ce7f19-b02a-4b6e-81e7-a955f257436d

┌─id─┬───────────timestamp─┬─metric_name─┬─metric_value─┐
│ 1 │ 2023-09-20 00:01:00 │ ABC │ 10 │
│ 3 │ 2023-09-20 00:01:00 │ ABC │ 30 │
│ 9 │ 2023-09-20 00:02:00 │ ABC │ 90 │
│ 11 │ 2023-09-20 00:02:00 │ ABC │ 110 │
│ 12 │ 2023-09-20 00:02:00 │ ABC │ 120 │
│ 17 │ 2023-09-20 00:03:00 │ ABC │ 170 │
│ 18 │ 2023-09-20 00:03:00 │ ABC │ 180 │
│ 19 │ 2023-09-20 00:03:00 │ ABC │ 190 │
└────┴─────────────────────┴─────────────┴──────────────┘

· 3 min read

Question

How do I set up ClickHouse with a Docker image to connect to Microsoft SQL Server?

Answer

Notes on this example

  • Uses the ClickHouse Docker Ubuntu image
  • Uses the FreeTDS Driver
  • Uses MSSQL Server 2012R2
  • Windows hostname for this example is MARSDB2.marsnet2.local at IP: 192.168.1.133 (update with your hostname and/or IP)
  • MSSQL Instance name MARSDB2
  • MSSQL Login and datbase users are sql_user

Example setup in MSSQL for testing

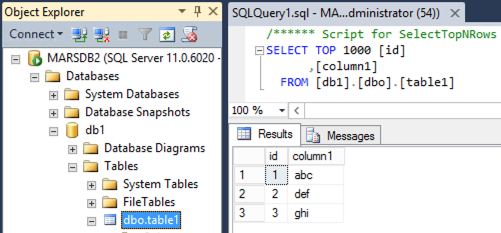
Database and table created in MSSQL:

Screenshot 2024-01-01 at 8 25 50 PM

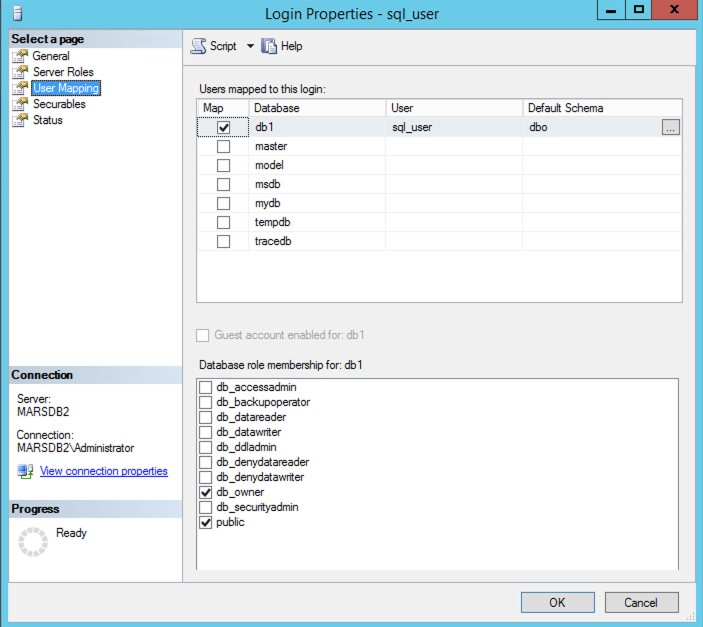
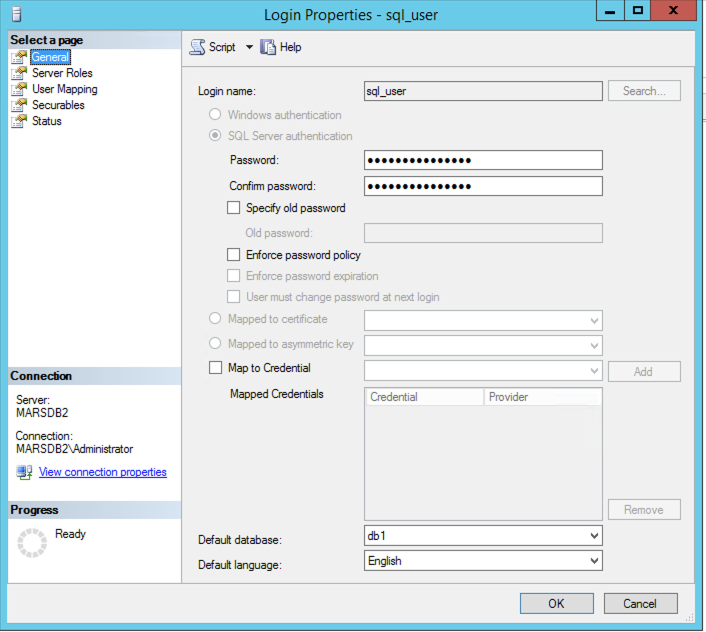
MSSQL Login User, sql_user:

Screenshot 2024-01-01 at 8 27 11 PM

Database membership roles for sql_user:

Screenshot 2024-01-01 at 8 27 35 PM

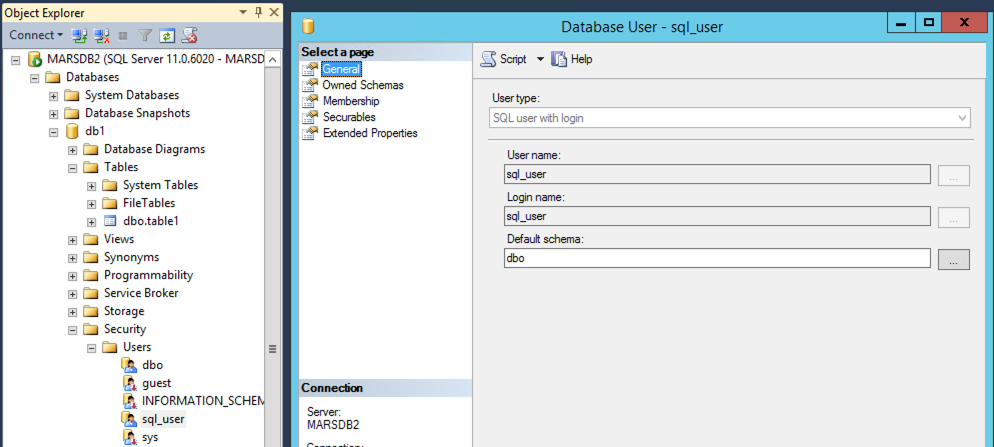
Database User with Login:

Screenshot 2024-01-01 at 8 35 34 PM

Configuring ClickHouse with ODBC

Create a working directory:

mkdir ch-odbc-mssql
cd ch-odbc-mssql

Create an odbc.ini file:

vim odbc.ini

Add the following entries to update the name of the DSN and IP:

[marsdb2_mssql]
Driver = FreeTDS
Server = 192.168.1.133

Create an odbcinst.ini file:

vim odbcinst.ini

Add the following entries (trace is optional but helps with debugging):

[ODBC]
Trace = Yes
TraceFile = /tmp/odbc.log

[FreeTDS]
Description = FreeTDS
Driver = /usr/lib/aarch64-linux-gnu/odbc/libtdsodbc.so
Setup = /usr/lib/x86_64-linux-gnu/odbc/libtdsS.so
UsageCount = 1

Configure a Dockerfile to download the image and add the TDS and required ODBC libraries

Create the Dockerfile:

vim Dockerfile

Add the contents of the Dockerfile:

FROM clickhouse/clickhouse-server:23.10

# Install the ODBC driver

RUN apt-get update && apt-get install -y --no-install-recommends unixodbc \
&& apt-get install -y freetds-bin freetds-common freetds-dev libct4 libsybdb5 \
&& apt-get install tdsodbc

Build the new docker image:

docker build . -t marsnet/clickhouse-odbc:23.10

Create a docker-compose.yml file:

vim docker-compose.yml

Add the following contents to the YAML:

version: '3.7'
services:
clickhouse:
image: marsnet/clickhouse-odbc:23.10
container_name: clickhouse-odbc
hostname: clickhouse-host
ports:
- "9000:9000"
- "8123:8123"
- "9009:9009"
volumes:
- ./odbc.ini:/etc/odbc.ini
- ./odbcinst.ini:/etc/odbcinst.ini
restart: always
ulimits:
memlock:
soft: -1
hard: -1
nofile:
soft: 262144
hard: 262144
deploy:
resources:
limits:
memory: 4g

Start the container:

docker compose up --detach

After you start the container, you should see something like this:

ch-odbc-mssql % docker compose up --detach
[+] Running 1/1
✔ Container clickhouse-odbc Started

Check to ensure the container is running:

ch-odbc-mssql % docker ps
CONTAINER ID IMAGE COMMAND CREATED STATUS PORTS NAMES
87a400b803ce marsnet/clickhouse-odbc:23.10 "/entrypoint.sh" 57 minutes ago Up About a minute 0.0.0.0:8123->8123/tcp, 0.0.0.0:9000->9000/tcp, 0.0.0.0:9009->9009/tcp clickhouse-odbc

Test ODBC connection

Login with the ClickHouse client:

./clickhouse client

Test the SELECT using the odbc table function to the remote MSSQL Database table:

clickhouse-host :) SELECT * from odbc('DSN=marsdb2_mssql;port=1433;Uid=sql_user;Pwd=ClickHouse123;Database=db1', 'table1');

SELECT *
FROM odbc('DSN=marsdb2_mssql;port=1433;Uid=sql_user;Pwd=ClickHouse123;Database=db1', 'table1')

Query id: 23494da2-6e12-4ade-95fa-372a0420cac1

┌─id─┬─column1─┐
│ 1 │ abc │
│ 2 │ def │
│ 3 │ ghi │
└────┴─────────┘

3 rows in set. Elapsed: 0.188 sec.

You can also create a remote table using the odbc table engine:

CREATE TABLE table1_odbc_mssql
(
`id` Int32,
`column1` String
)
ENGINE = ODBC('DSN=marsdb2_mssql;port=1433;Uid=sql_user;Pwd=ClickHouse123;Database=db1', 'dbo', 'table1')

Use a SELECT query to test the new remote table:

clickhouse-host :) select * from table1_odbc_mssql;

SELECT *
FROM table1_odbc_mssql

Query id: 94724368-485d-4364-ae58-a435a225c37d

┌─id─┬─column1─┐
│ 1 │ abc │
│ 2 │ def │
│ 3 │ ghi │
└────┴─────────┘

3 rows in set. Elapsed: 0.218 sec.

For more information, please see:

· 2 min read

Question

How do I work with JSON message using a source or landing table to extract with a Materialized View?
How do I work with JSON without the experimental JSON Object?

Answer

A common pattern to work with JSON data is to send the data to a landing table and use JSONExtract functions to pull the data onto a new table using a Materialized View trigger. This is normally done in the following flow and pattern:

source data --> MergeTree table --> Materialized View (with base table) --> application/client

The landing table should have a raw string field where you would store the raw json. It should also have one to two other fields that can be used for management of that table so that it could be partitioned and trimmed as the data ages.

*some integrations can add fields to the original data for example if using the ClickHouse Kafka Connector Sink.

Simplified example below:

  • create the example database
create database db1;
  • create a landing table where your raw json will be inserted:
create table db1.table2_json_raw
(
id Int32,
timestamp DateTime,
raw String
)
engine = MergeTree()
order by timestamp;
  • create the base table for the materialized view
create table db1.table2_json_mv_base
(
id Int32,
timestamp DateTime,
raw_string String,
custId Int8,
custName String
)
engine = MergeTree()
order by timestamp;
  • create the materialized view to the base table
create materialized view db1.table2_json_mv to db1.table2_json_mv_base
AS SELECT
id,
timestamp,
raw as raw_string,
simpleJSONExtractRaw(raw, 'customerId') as custId,
simpleJSONExtractRaw(raw, 'customerName') as custName
FROM
db1.table2_json_raw;
  • insert some sample rows
 insert into db1.table2_json_raw
values
(1, '2024-05-16 00:00:00', '{"customerId":1, "customerName":"ABC"}'),
(2, '2024-05-16 00:00:01', '{"customerId":2, "customerName":"XYZ"}');
  • view the results from the extraction and the materialized view that would be used in the queries
clickhouse-cloud :) select * from db1.table2_json_mv;

SELECT *
FROM db1.table2_json_mv

Query id: 12655fd3-567a-4dfb-9ef7-abc4b11ad044

┌─id─┬───────────timestamp─┬─raw_string─────────────────────────────┬─custId─┬─custName─┐
│ 1 │ 2024-05-16 00:00:00 │ {"customerId":1, "customerName":"ABC"} │ 1 │ "ABC" │
│ 2 │ 2024-05-16 00:00:01 │ {"customerId":2, "customerName":"XYZ"} │ 2 │ "XYZ" │
└────┴─────────────────────┴────────────────────────────────────────┴────────┴──────────┘

Additional Reference links:
Materialized Views: https://clickhouse.com/docs/en/guides/developer/cascading-materialized-views
Working with JSON: https://clickhouse.com/docs/en/integrations/data-formats/json#other-approaches
JSON functions: https://clickhouse.com/docs/en/sql-reference/functions/json-functions

· 6 min read

This example shows how AD users that belong to different AD security groups can be given role access in ClickHouse. It also shows how a user may be added to multiple AD user groups so they can have access provided by multiple roles.

In this environment, we have the following:

  • A Windows Active Directory domain: marsnet2.local
  • A ClickHouse Cluster, cluster_1S_3R with 3 nodes on a cluster configuration of 1 shard, 3 replicas
  • 3 AD users
AD UserDescription
clickhouse_ad_adminClickHouse Admin user
clickhouse_db1_userUser with access to db1.table1
clickhouse_db2_userUser with access to db2.table1
ch_db1_db2_userUser with access to both db1.table1 and db2.table1
  • 3 AD security groups
AD GroupDescription
clickhouse_ad_adminsClickHouse Admins group
clickhouse_ad_db1_usersGroup to map with access to db1.table1
clickhouse_ad_db2_usersGroup to map with access to db2.table1
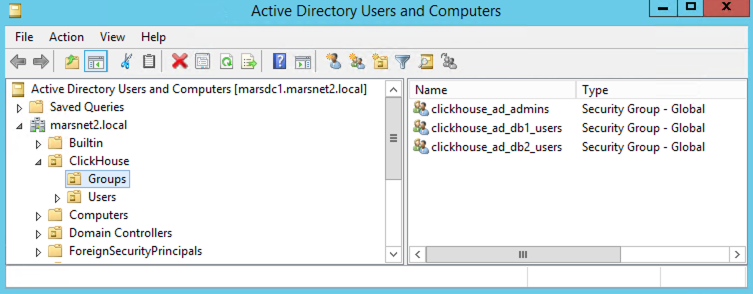
  • Example AD Environment and UO structure:

Example_AD_Env_and_UO_structure

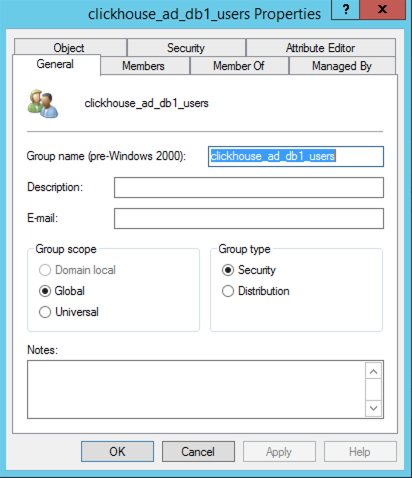
  • Example AD Security Group Configuration:

Example_AD_Group_clickhouse_ad_db1_users

  • Example AD User Configuration:

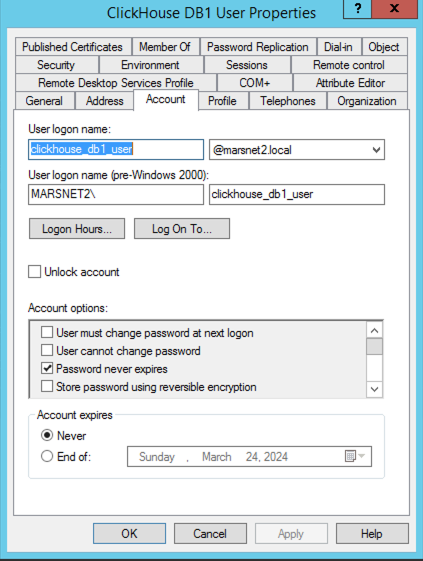
Example_AD_user_clickhouse_db1_user

  1. In Windows AD Users and Groups, add each user to their respective group(s), they will be mapped to the ClickHouse roles (example in the next step).
AD Security GroupClickHouse Role
clickhouse_ad_adminclickhouse_ad_admins
clickhouse_db1_userclickhouse_ad_db1_users
clickhouse_db2_userclickhouse_ad_db2_users
ch_db1_db2_userclickhouse_ad_db1_users and clickhouse_ad_db2_users
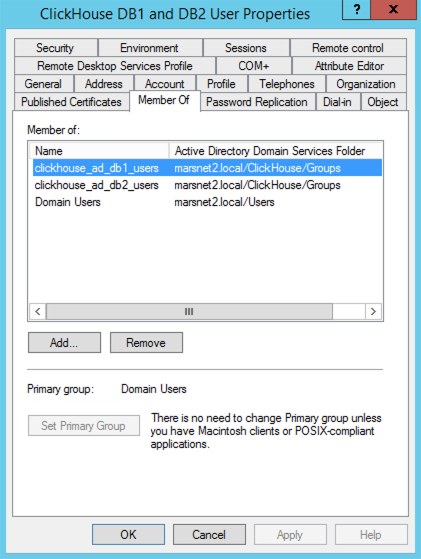
  • Example user group membership:

Example_AD_user_to_group

  1. In ClickHouse config.xml, add the ldap_servers configuration to each ClickHouse node.
<ldap_servers>
<marsnet2_ad>
<host>marsdc1.marsnet2.local</host>
<port>389</port>
<bind_dn>{user_name}@marsnet2.local</bind_dn>
<user_dn_detection>
<base_dn>OU=Users,OU=ClickHouse,DC=marsnet2,DC=local</base_dn>
<search_filter>(&amp;(objectClass=user)(sAMAccountName={user_name}))</search_filter>
</user_dn_detection>
<enable_tls>no</enable_tls>
</marsnet2_ad>
</ldap_servers>
xml tagDescriptionExample Value
ldap_serversTag used to define the ldap servers that will be used by ClickHouseNA
marsnet_adThis tag is arbitrary and is just a label to use to identify the server in <user_directories> sectionNA
hostFQDN or IP Address of Active Directory server or domainmarsdc1.marsnet2.local
portActive Directory Port, usually 389 for non-ssl or 636 for SSL389
bind_dnWhich user will be used to create the bind to AD, it can be a dedicated user if regular users are not allowed to{user_name}@marsnet2.local
user_dn_detectionSettings on how ClickHouse will find the AD usersNA
base_dnAD OU path to start the search for the usersOU=Users,OU=ClickHouse,DC=marsnet2,DC=local
search_filterldap search filter to find the AD user(&(objectClass=user)(sAMAccountName={user_name}))

Refer to documentation for full set of options: https://clickhouse.com/docs/en/operations/external-authenticators/ldap#ldap-server-definition

  1. In ClickHouse config.xml, add the <user_directories> configuration with <ldap> entries to each ClickHouse node.
<user_directories>
<users_xml>
<path>users.xml</path>
</users_xml>
<local_directory>
<path>/var/lib/clickhouse/access/</path>
</local_directory>
<ldap>
<server>marsnet2_ad</server>
<role_mapping>
<base_dn>OU=Groups,OU=ClickHouse,DC=marsnet2,DC=local</base_dn>
<search_filter>(&amp;(objectClass=group)(member={user_dn}))</search_filter>
<attribute>CN</attribute>
<scope>subtree</scope>
<prefix>clickhouse_</prefix>
</role_mapping>
</ldap>
</user_directories>
xml tagDescriptionExample Value
user_directoriesDefines which authenticators will be usedNA
ldapThis contains the settings for the ldap servers, in this AD that will be usedNA
serverThis is the tag that was define in the <ldap_servers> sectionmarsnet2_ad
role_mappingdefinition on how the users authenticated will be mapped between AD groups and ClickHouse rolesNA
base_dnAD path that the system will use to start search for AD groupsOU=Groups,OU=ClickHouse,DC=marsnet2,DC=local
search_filterldap search filter to find the AD groups(&(objectClass=group)(member={user_dn}))
attributeWhich AD attribute field should be used to identify the userCN
scopeWhich levels in the base DN the system should search for the groupssubtree
prefixPrefix for the names of the groups in AD, this prefix will be removed to find the roles in ClickHouseclickhouse_

Refer to documentation for full set of options: https://clickhouse.com/docs/en/operations/external-authenticators/ldap#ldap-external-user-directory

note::: Since the AD security groups were prefixed in the example - i.e. clickhouse_ad_db1_users- when the system retrieves them, the prefix will be removed and the system will look for a ClickHouse role called ad_db1_users to map to clickhouse_ad_db1_users. :::

  1. Create example databases.
create database db1 on cluster 'cluster_1S_3R';
create database db2 on cluster 'cluster_1S_3R';
  1. Create example tables.
create table db1.table1 on cluster 'cluster_1S_3R'
(
id Int32,
column1 String
)
engine = MergeTree()
order by id;

create table db2.table1 on cluster 'cluster_1S_3R
(
id Int32,
column1 String
)
engine = MergeTree()
order by id;
  1. Insert sample data.
insert into db1.table1
values
(1, 'a');

insert into db2.table1
values
(2, 'b');
  1. Create ClickHouse Roles.
create role ad_admins on cluster 'cluster_1S_3R';
create role ad_db1_users on cluster 'cluster_1S_3R';
create role ad_db2_users on cluster 'cluster_1S_3R';
  1. Grant the privileges to the roles.
GRANT SHOW, SELECT, INSERT, ALTER, CREATE, DROP, UNDROP TABLE, TRUNCATE, OPTIMIZE, BACKUP, KILL QUERY, KILL TRANSACTION, MOVE PARTITION BETWEEN SHARDS, ACCESS MANAGEMENT, SYSTEM, dictGet, displaySecretsInShowAndSelect, INTROSPECTION, SOURCES, CLUSTER ON *.* on cluster 'cluster_1S_3R' TO ad_admins WITH GRANT OPTION;

GRANT SELECT ON db1.table1 on cluster 'cluster_1S_3R' TO ad_db1_users;

GRANT SELECT ON db2.table1 on cluster 'cluster_1S_3R' TO ad_db2_users;
  1. Test access for restricted db1 user. For example:
root@chnode1:/etc/clickhouse-server# clickhouse-client --user clickhouse_db1_user --password MyPassword123  --secure --port 9440 --host chnode1.marsnet.local
ClickHouse client version 24.1.3.31 (official build).
Connecting to chnode1.marsnet.local:9440 as user clickhouse_db1_user.
Connected to ClickHouse server version 24.1.3.


clickhouse :) select * from db1.table1;

SELECT *
FROM db1.table1

Query id: b04b92d6-5b8b-40a2-a92a-f06f15774930

┌─id─┬─column1─┐
│ 1 │ a │
└────┴─────────┘

1 row in set. Elapsed: 0.004 sec.

clickhouse :) select * from db2.table1;

SELECT *
FROM db2.table1

Query id: 7f7eaa44-7b47-4184-807a-6968a56057ad


Elapsed: 0.115 sec.

Received exception from server (version 24.1.3):
Code: 497. DB::Exception: Received from chnode1.marsnet.local:9440. DB::Exception: clickhouse_db1_user: Not enough privileges. To execute this query, it's necessary to have the grant SELECT(id, column1) ON db2.table1. (ACCESS_DENIED)
  1. Test access for the user that has access to both databases, db1 and db2. For example:
root@chnode1:/etc/clickhouse-server# clickhouse-client --user ch_db1_db2_user --password MyPassword123  --secure --port 9440 --host chnode1.marsnet.local
ClickHouse client version 24.1.3.31 (official build).
Connecting to chnode1.marsnet.local:9440 as user ch_db1_db2_user.
Connected to ClickHouse server version 24.1.3.

clickhouse :) select * from db1.table1;

SELECT *
FROM db1.table1

Query id: 23084744-08c2-48bd-8635-a23438812026

┌─id─┬─column1─┐
│ 1 │ a │
└────┴─────────┘

1 row in set. Elapsed: 0.005 sec.

clickhouse :) select * from db2.table1;

SELECT *
FROM db2.table1

Query id: f9954ec4-d8d9-4b5a-9f68-a7aa79a1bb4a

┌─id─┬─column1─┐
│ 2 │ b │
└────┴─────────┘

1 row in set. Elapsed: 0.004 sec.
  1. Test access for the Admin user. For example:
root@chnode1:/etc/clickhouse-server# clickhouse-client --user clickhouse_ad_admin --password MyPassword123  --secure --port 9440 --host chnode1.marsnet.local
ClickHouse client version 24.1.3.31 (official build).
Connecting to chnode1.marsnet.local:9440 as user clickhouse_ad_admin.
Connected to ClickHouse server version 24.1.3.

clickhouse :) create table db1.table2 on cluster 'cluster_1S_3R'
(
id Int32,
column1 String
)
engine = MergeTree()
order by id;

CREATE TABLE db1.table2 ON CLUSTER cluster_1S_3R
(
`id` Int32,
`column1` String
)
ENGINE = MergeTree
ORDER BY id

Query id: 6041fd32-4294-44bd-b442-3fdd41333e6f

┌─host──────────────────┬─port─┬─status─┬─error─┬─num_hosts_remaining─┬─num_hosts_active─┐
│ chnode1.marsnet.local │ 9440 │ 0 │ │ 2 │ 2 │
└───────────────────────┴──────┴────────┴───────┴─────────────────────┴──────────────────┘
┌─host──────────────────┬─port─┬─status─┬─error─┬─num_hosts_remaining─┬─num_hosts_active─┐
│ chnode2.marsnet.local │ 9440 │ 0 │ │ 1 │ 1 │
└───────────────────────┴──────┴────────┴───────┴─────────────────────┴──────────────────┘
┌─host──────────────────┬─port─┬─status─┬─error─┬─num_hosts_remaining─┬─num_hosts_active─┐
│ chnode3.marsnet.local │ 9440 │ 0 │ │ 0 │ 0 │
└───────────────────────┴──────┴────────┴───────┴─────────────────────┴──────────────────┘

· 6 min read

Overview: This article walks through the process of sending data from a Kafka topic to a ClickHouse table. We’ll use the Wiki recent changes feed, which provides a stream of events that represent changes made to various Wikimedia properties. The steps include:

  1. How to setup Kafka on Ubuntu
  2. Ingest a stream of data into a Kakfa topic
  3. Create a ClickHouse table that subscribes to the topic

1. Setup Kafka on Ubuntu

  1. Create an Ubuntu ec2 instance and SSH on to it:
ssh -i ~/training.pem ubuntu@ec2.compute.amazonaws.com
  1. Install Kafka (based on the instructions here: https://www.linode.com/docs/guides/how-to-install-apache-kafka-on-ubuntu/):
sudo apt update
sudo apt install openjdk-11-jdk

mkdir /home/ubuntu/kafka
cd /home/ubuntu/kafka/

wget https://downloads.apache.org/kafka/3.7.0/kafka_2.13-3.7.0.tgz

tar -zxvf kafka_2.13-3.7.0.tgz
  1. Start ZooKeeper:
cd kafka_2.13-3.7.0
bin/zookeeper-server-start.sh config/zookeeper.properties
  1. Open a new console and launch Kafka:
ssh -i ~/training.pem ubuntu@ec2.compute.amazonaws.com
cd kafka/kafka_2.13-3.7.0/
bin/kafka-server-start.sh config/server.properties
  1. Open a third console and create a topic named wikimedia:
ssh -i ~/training.pem ubuntu@ec2.compute.amazonaws.com
cd kafka/kafka_2.13-3.7.0/

bin/kafka-topics.sh --create --topic wikimedia --bootstrap-server localhost:9092
  1. You can verify it was created successfully by:
bin/kafka-topics.sh --list --bootstrap-server localhost:9092

2. Ingest the Wikimedia Stream into Kafka

  1. We need some utilities first:
sudo apt-get install librdkafka-dev libyajl-dev
sudo apt-get install kafkacat
  1. The data is sent to Kafka using a clever curl command that grabs the latest Wikimedia events, parses out the JSON data and sends that to the Kafka topic:
curl -N https://stream.wikimedia.org/v2/stream/recentchange  | awk '/^data: /{gsub(/^data: /, ""); print}' | kafkacat -P -b localhost:9092 -t wikimedia
  1. You can "describe" the topic:
bin/kafka-topics.sh --describe --topic wikimedia --bootstrap-server localhost:9092
  1. Let's verify everything is working by consuming some events:
bin/kafka-console-consumer.sh --topic wikimedia --from-beginning --bootstrap-server localhost:9092
  1. Hit Ctrl+c to kill the previous command.

3. Ingest the Data into ClickHouse

  1. Here is what the incoming data looks like:
{
"$schema": "/mediawiki/recentchange/1.0.0",
"meta": {
"uri": "https://www.wikidata.org/wiki/Q45791749",
"request_id": "f64cfb17-04ba-4d09-8935-38ec6f0001c2",
"id": "9d7d2b5a-b79b-45ea-b72c-69c3b69ae931",
"dt": "2024-04-18T13:21:21Z",
"domain": "www.wikidata.org",
"stream": "mediawiki.recentchange",
"topic": "eqiad.mediawiki.recentchange",
"partition": 0,
"offset": 5032636513
},
"id": 2196113017,
"type": "edit",
"namespace": 0,
"title": "Q45791749",
"title_url": "https://www.wikidata.org/wiki/Q45791749",
"comment": "/* wbsetqualifier-add:1| */ [[Property:P1545]]: 20, Modify PubMed ID: 7292984 citation data from NCBI, Europe PMC and CrossRef",
"timestamp": 1713446481,
"user": "Cewbot",
"bot": true,
"notify_url": "https://www.wikidata.org/w/index.php?diff=2131981357&oldid=2131981341&rcid=2196113017",
"minor": false,
"patrolled": true,
"length": {
"old": 75618,
"new": 75896
},
"revision": {
"old": 2131981341,
"new": 2131981357
},
"server_url": "https://www.wikidata.org",
"server_name": "www.wikidata.org",
"server_script_path": "/w",
"wiki": "wikidatawiki",
"parsedcomment": "<span dir=\"auto\"><span class=\"autocomment\">Added qualifier: </span></span> <a href=\"/wiki/Property:P1545\" title=\"series ordinal | position of an item in its parent series (most frequently a 1-based index), generally to be used as a qualifier (different from &quot;rank&quot; defined as a class, and from &quot;ranking&quot; defined as a property for evaluating a quality).\"><span class=\"wb-itemlink\"><span class=\"wb-itemlink-label\" lang=\"en\" dir=\"ltr\">series ordinal</span> <span class=\"wb-itemlink-id\">(P1545)</span></span></a>: 20, Modify PubMed ID: 7292984 citation data from NCBI, Europe PMC and CrossRef"
}
  1. We will need the Kafka table engine to pull the data from the Kafka topic:
CREATE OR REPLACE TABLE wikiQueue
(
`id` UInt32,
`type` String,
`title` String,
`title_url` String,
`comment` String,
`timestamp` UInt64,
`user` String,
`bot` Bool,
`server_url` String,
`server_name` String,
`wiki` String,
`meta` Tuple(uri String, id String, stream String, topic String, domain String)
)
ENGINE = Kafka(
'ec2.compute.amazonaws.com:9092',
'wikimedia',
'consumer-group-wiki',
'JSONEachRow'
);
  1. For some reason the Kafka table engine seems to take the public ec2 URL and convert it to the private DNS name, so I had to add that to my local /etc/hosts file:
52.14.154.92  ip.us-east-2.compute.internal
  1. You can read from a Kafka table, you just have to enable a setting:
SELECT *
FROM wikiQueue
LIMIT 20
FORMAT Vertical
SETTINGS stream_like_engine_allow_direct_select = 1;

The rows should come back nicely parsed based on the columns defined in the wikiQueue table:

id:          2473996741
type: edit
title: File:Père-Lachaise - Division 6 - Cassereau 05.jpg
title_url: https://commons.wikimedia.org/wiki/File:P%C3%A8re-Lachaise_-_Division_6_-_Cassereau_05.jpg
comment: /* wbcreateclaim-create:1| */ [[d:Special:EntityPage/P921]]: [[d:Special:EntityPage/Q112327116]], [[:toollabs:quickstatements/#/batch/228454|batch #228454]]
timestamp: 1713457283
user: Ameisenigel
bot: false
server_url: https://commons.wikimedia.org
server_name: commons.wikimedia.org
wiki: commonswiki
meta: ('https://commons.wikimedia.org/wiki/File:P%C3%A8re-Lachaise_-_Division_6_-_Cassereau_05.jpg','01a832e2-24c5-4ccb-bd93-8e2c0e429418','mediawiki.recentchange','eqiad.mediawiki.recentchange','commons.wikimedia.org')
  1. We need a MergeTree table to store these incoming events:
CREATE TABLE rawEvents (
id UInt64,
type LowCardinality(String),
comment String,
timestamp DateTime64(3, 'UTC'),
title_url String,
topic LowCardinality(String),
user String
)
ENGINE = MergeTree
ORDER BY (type, timestamp);
  1. Let's define a materialized view that gets triggered when an insert occurs on the Kafka table and sends the data to our rawEvents table:
CREATE MATERIALIZED VIEW rawEvents_mv TO rawEvents
AS
SELECT
id,
type,
comment,
toDateTime(timestamp) AS timestamp,
title_url,
tupleElement(meta, 'topic') AS topic,
user
FROM wikiQueue
WHERE title_url <> '';
  1. You should start seeing data going into rawEvents almost immediately:
SELECT count()
FROM rawEvents;
  1. Let's view some of the rows:
SELECT *
FROM rawEvents
LIMIT 5
FORMAT Vertical
Row 1:
──────
id: 124842852
type: 142
comment: Pere prlpz commented on "Plantilles Enciclopèdia Catalana" (Diria que no cal fer res als articles. Es pot actualitzar els enllaços que es facin servir a les referències (tot i que l'antic encara ha...)
timestamp: 2024-04-18 16:22:29.000
title_url: https://ca.wikipedia.org/wiki/Tema:Wu36d6vfsiuu4jsi
topic: eqiad.mediawiki.recentchange
user: Pere prlpz

Row 2:
──────
id: 2473996748
type: categorize
comment: [[:File:Ruïne van een poortgebouw, RP-T-1976-29-6(R).jpg]] removed from category
timestamp: 2024-04-18 16:21:20.000
title_url: https://commons.wikimedia.org/wiki/Category:Pieter_Moninckx
topic: eqiad.mediawiki.recentchange
user: Warburg1866

Row 3:
──────
id: 311828596
type: categorize
comment: [[:Cujo (película)]] añadida a la categoría
timestamp: 2024-04-18 16:21:21.000
title_url: https://es.wikipedia.org/wiki/Categor%C3%ADa:Pel%C3%ADculas_basadas_en_obras_de_Stephen_King
topic: eqiad.mediawiki.recentchange
user: Beta15

Row 4:
──────
id: 311828597
type: categorize
comment: [[:Cujo (película)]] eliminada de la categoría
timestamp: 2024-04-18 16:21:21.000
title_url: https://es.wikipedia.org/wiki/Categor%C3%ADa:Trabajos_basados_en_obras_de_Stephen_King
topic: eqiad.mediawiki.recentchange
user: Beta15

Row 5:
──────
id: 48494536
type: categorize
comment: [[:braiteremmo]] ajoutée à la catégorie
timestamp: 2024-04-18 16:21:21.000
title_url: https://fr.wiktionary.org/wiki/Cat%C3%A9gorie:Wiktionnaire:Exemples_manquants_en_italien
topic: eqiad.mediawiki.recentchange
user: Àncilu bot
  1. Let's see what types of events are coming in:
SELECT
type,
count()
FROM rawEvents
GROUP BY type
   ┌─type───────┬─count()─┐
1. │ 142 │ 1 │
2. │ new │ 1003 │
3. │ categorize │ 12228 │
4. │ log │ 1799 │
5. │ edit │ 17142 │
└────────────┴─────────┘

Let's define a materialized view chained to our current materialized view. We will keep track of some aggregated stats per minute:

CREATE TABLE byMinute
(
`dateTime` DateTime64(3, 'UTC') NOT NULL,
`users` AggregateFunction(uniq, String),
`pages` AggregateFunction(uniq, String),
`updates` AggregateFunction(sum, UInt32)
)
ENGINE = AggregatingMergeTree
ORDER BY dateTime;

CREATE MATERIALIZED VIEW byMinute_mv TO byMinute
AS SELECT
toStartOfMinute(timestamp) AS dateTime,
uniqState(user) AS users,
uniqState(title_url) AS pages,
sumState(toUInt32(1)) AS updates
FROM rawEvents
GROUP BY dateTime;
  1. We will need -Merge functions to view the results:
SELECT
dateTime AS dateTime,
uniqMerge(users) AS users,
uniqMerge(pages) AS pages,
sumMerge(updates) AS updates
FROM byMinute
GROUP BY dateTime
ORDER BY dateTime DESC
LIMIT 10;

· One min read

In order to build and contribute to ClickHouse, you must use LLVM and Clang.

These are the commands to build the latest version of LLVM and Clang on Linux:

git clone git@github.com:llvm/llvm-project.git
mkdir llvm-build
cd llvm-build
cmake -GNinja -DCMAKE_BUILD_TYPE:STRING=Release -DLLVM_ENABLE_PROJECTS=all -DLLVM_TARGETS_TO_BUILD=all ../llvm-project/llvm
time ninja
sudo ninja install

· 3 min read

This is useful when there are tables that have similar naming conventions and similar columns but are not replicated. An example is searching the system database for entries in the query log tables.

The query_log table is not replicated, and only queries that are executed on a specific node get logged. Data may also roll to a different table For example, data may be inserted into query_log_0, query_log_1, etc. Since one node may roll at a different time than others, it is useful to try to find the data we're looking for in tables that are not exactly named the same.

In essence, we need to do something like this, but in ClickHouse syntax:

SELECT column1, column2 FROM my_db.my_table_*

For this, we can use the clusterAllReplicas() to search all the nodes and the merge() table function to be able to use a regex pattern to search the multiple tables.

The following example shows how to query all tables with the prefix query_log:

clickhouse-cloud :) SELECT 
`event_time`,
`query_id`,
`query`,
`type`
FROM
clusterAllReplicas(default,merge('system', '^query_log*'))
WHERE
query ilike '%db1.table1%' and event_time > now() - toIntervalMinute(5);

SELECT
event_time,
query_id,
query,
type
FROM clusterAllReplicas(default, merge('system', '^query_log*'))
WHERE (query ILIKE '%db1.table1%') AND (event_time > (now() - toIntervalMinute(5)))

Query id: de95c13e-5759-436e-90d9-a12c1327889e

┌──────────event_time─┬─query_id─────────────────────────────┬─query──────────────────────────────────────────────────────────────────────────────────────────────────────────────────────────────────────────────────────────────────────────────┬─type────────┐
│ 2024-02-08 00:15:20 │ d1dd0d6a-4337-4e58-bdd1-c2c827b6dfe2 │ /* ddl_entry=query-0000000428 */ CREATE TABLE db1.table1 UUID '781f25db-3cd1-47c6-a76e-701945a67485' (`id` Int32, `string_column` String) ENGINE = ReplicatedMergeTree ORDER BY id │ QueryStart │
│ 2024-02-08 00:15:20 │ d1dd0d6a-4337-4e58-bdd1-c2c827b6dfe2 │ /* ddl_entry=query-0000000428 */ CREATE TABLE db1.table1 UUID '781f25db-3cd1-47c6-a76e-701945a67485' (`id` Int32, `string_column` String) ENGINE = ReplicatedMergeTree ORDER BY id │ QueryFinish │
└─────────────────────┴──────────────────────────────────────┴────────────────────────────────────────────────────────────────────────────────────────────────────────────────────────────────────────────────────────────────────────────────────┴─────────────┘
┌──────────event_time─┬─query_id─────────────────────────────┬─query──────────────────────────────────────────────────────────────────────────────────────────────────────────────────────────────────────────────────────────────────────────────┬─type────────┐
│ 2024-02-08 00:15:20 │ f0ca43b2-544e-4b94-a21d-0f05e777fa96 │ /* ddl_entry=query-0000000428 */ CREATE TABLE db1.table1 UUID '781f25db-3cd1-47c6-a76e-701945a67485' (`id` Int32, `string_column` String) ENGINE = ReplicatedMergeTree ORDER BY id │ QueryStart │
│ 2024-02-08 00:15:20 │ f0ca43b2-544e-4b94-a21d-0f05e777fa96 │ /* ddl_entry=query-0000000428 */ CREATE TABLE db1.table1 UUID '781f25db-3cd1-47c6-a76e-701945a67485' (`id` Int32, `string_column` String) ENGINE = ReplicatedMergeTree ORDER BY id │ QueryFinish │
└─────────────────────┴──────────────────────────────────────┴────────────────────────────────────────────────────────────────────────────────────────────────────────────────────────────────────────────────────────────────────────────────────┴─────────────┘
┌──────────event_time─┬─query_id─────────────────────────────┬─query──────────────────────────────────────────────────────────────────────────────────────────────────────────────────────────────────────────────────────────────────────────────┬─type────────┐
│ 2024-02-08 00:15:20 │ 5cc0a508-7f64-460b-a5be-949ef1d1f2ca │ /* ddl_entry=query-0000000428 */ CREATE TABLE db1.table1 UUID '781f25db-3cd1-47c6-a76e-701945a67485' (`id` Int32, `string_column` String) ENGINE = ReplicatedMergeTree ORDER BY id │ QueryStart │
│ 2024-02-08 00:15:20 │ 5cc0a508-7f64-460b-a5be-949ef1d1f2ca │ /* ddl_entry=query-0000000428 */ CREATE TABLE db1.table1 UUID '781f25db-3cd1-47c6-a76e-701945a67485' (`id` Int32, `string_column` String) ENGINE = ReplicatedMergeTree ORDER BY id │ QueryFinish │
│ 2024-02-08 00:15:20 │ d1e01cb0-a27c-44b2-829c-90fb2596c9c0 │ create table db1.table1
(
id Int32,
string_column String
)
engine = MergeTree
order by id │ QueryStart │
│ 2024-02-08 00:15:20 │ d1e01cb0-a27c-44b2-829c-90fb2596c9c0 │ create table db1.table1
(
id Int32,
string_column String
)
engine = MergeTree
order by id │ QueryFinish │
│ 2024-02-08 00:15:27 │ 6c2c6c3f-173e-464f-bfa0-643089ca085e │ insert into db1.table1
values
│ QueryStart │
│ 2024-02-08 00:15:27 │ 6c2c6c3f-173e-464f-bfa0-643089ca085e │ insert into db1.table1
values
│ QueryFinish │
└─────────────────────┴──────────────────────────────────────┴────────────────────────────────────────────────────────────────────────────────────────────────────────────────────────────────────────────────────────────────────────────────────┴─────────────┘

10 rows in set. Elapsed: 0.046 sec. Processed 317.27 thousand rows, 33.57 MB (6.89 million rows/s., 729.43 MB/s.)
Peak memory usage: 67.04 MiB.

Note that the columns you select must exist on each of the tables being queried or you may encounter an error such as:

Received exception from server (version 24.0.2):
Code: 47. DB::Exception: Received from abc123.us-west-2.aws.clickhouse.cloud:9440. DB::Exception: Missing columns: 'hostname' while processing query: 'WITH 'query_log_0' AS _table

· 2 min read

Dictionaries created in ClickHouse Cloud may experience inconsistency during the initial creation phase. This means that you may not see any data in the dictionary right after creation. However, after several retries, the creation query may land on different replicas, and data will be visible.

This sometimes occurs because the dictionary was created before the part reached the server. As an example:

2024-01-25 13:38:25.615837 - CREATE DICTIONARY received
2024-01-25 13:38:25.626468 - CREATE DICTIONARY finished
2024-01-25 13:38:25.733008 - Part all_0_0_0 downloaded

As you can see, the part only arrived after the dictionary was created. This can be a bigger problem if you are using LIFETIME(MIN 0 MAX 0) because this means that dictionary will never be refreshed automatically. Therefore, the dictionary will remain empty until the command RELOAD DICTIONARIES is executed.

The solution to this issue is to use a SELECT query instead of specifying a source table when creating the dictionary and enabling the setting select_sequential_consistency=1.

Instead of specifying a source table:

SOURCE(CLICKHOUSE(
table 'test.temp_title_table_1706189903924'
user default password 'PASSWORD'))

Use a SELECT query with select_sequential_consistency=1:

SOURCE(CLICKHOUSE(QUERY
'SELECT songTitle, mappedTitle
FROM test.temp_title_table_1706189903924
SETTINGS select_sequential_consistency=1' USER default PASSWORD ''))

Why does this issue occur?

When you insert data and then create or reload a dictionary, the DDL may reach a replica before the data (or new data) does. This leads to the dictionaries being inconsistent between replicas. Then, depending on which replica receives the query, you may get different results.

Note that the same thing happens when you insert and immediately after read from a table. If you read from a replica that hasn't replicated the data yet, you won't see the newly inserted data. When you need sequential consistency, at the cost of performance (which is why it's generally not recommended to use) you can enable select_sequential_consistency.

The case of dictionaries is a bit trickier since dictionaries don't use the settings from the query, but the settings from the server. As a result, when loading data into the dictionary, even if you SET select_sequential_consistency=1 data may load inconsistently across replicas. Specifying select_sequential_consistency=1 in the dictionary source query allows the dictionary to adhere to this setting even if it's not globally enabled as a server setting.