· 3 min read

Question

How can I backup a specific partition in ClickHouse?

Answer

See the below example, this uses the S3(Minio) disk configuration listed in our docker compose examples page.

note

This does NOT apply to ClickHouse Cloud

Create a table:

ch_minio_s3 :) CREATE TABLE my_table
(
`event_time` DateTime,
`field_foo` String,
`field_bar` String,
`number` UInt256
)
ENGINE = MergeTree
PARTITION BY number % 2
ORDER BY tuple()

CREATE TABLE my_table
(
`event_time` DateTime,
`field_foo` String,
`field_bar` String,
`number` UInt256
)
ENGINE = MergeTree
PARTITION BY number % 2
ORDER BY tuple()

Query id: a1a54a5a-eac0-477c-b847-b40acaa62780

Ok.

0 rows in set. Elapsed: 0.016 sec.

Add some data that will fill both partitions equally:

ch_minio_s3 :) INSERT INTO my_table SELECT
toDateTime(now() + number) AS event_time,
randomPrintableASCII(10) AS field_foo,
randomPrintableASCII(20) AS field_bar,
number
FROM numbers(1000000)

INSERT INTO my_table SELECT
toDateTime(now() + number) AS event_time,
randomPrintableASCII(10) AS field_foo,
randomPrintableASCII(20) AS field_bar,
number
FROM numbers(1000000)

Query id: bf6ef803-5747-4ea1-ad00-a17967e349b6

Ok.

0 rows in set. Elapsed: 0.282 sec. Processed 1.00 million rows, 8.00 MB (3.55 million rows/s., 28.39 MB/s.)

verify data:

ch_minio_s3 :) SELECT
_partition_id AS partition_id,
cityHash64(sum(number)) AS hash,
count() AS count
FROM my_table
GROUP BY partition_id

SELECT
_partition_id AS partition_id,
cityHash64(sum(number)) AS hash,
count() AS count
FROM my_table
GROUP BY partition_id

Query id: d8febfb0-5339-4f97-aefa-ef0003128526

┌─partition_id─┬─cityHash64(sum(number))─┬──count─┐
015460940821314360342500000
111827822647069388611500000
└──────────────┴─────────────────────────┴────────┘

2 rows in set. Elapsed: 0.025 sec. Processed 1.00 million rows, 32.00 MB (39.97 million rows/s., 1.28 GB/s.)

backup partition with id 1 to configured s3 disk:

ch_minio_s3 :) BACKUP TABLE my_table PARTITION 1 TO Disk('s3','backups/');

BACKUP TABLE my_table PARTITION 1 TO Disk('s3', 'backups/')

Query id: 810f6144-e282-42e2-99d0-9a80c75a927d

┌─id───────────────────────────────────┬─status─────────┐
4d1da197-c4c9-4b6e-966c-76202eadbd53 │ BACKUP_CREATED │
└──────────────────────────────────────┴────────────────┘

1 row in set. Elapsed: 0.095 sec.

Drop the table:

ch_minio_s3 :) DROP TABLE my_table

DROP TABLE my_table

Query id: c3456044-4689-406e-82ac-8d08b8b618fe

Ok.

0 rows in set. Elapsed: 0.007 sec.

restore just partition with id 1 from backup:

ch_minio_s3 :) RESTORE TABLE my_table PARTITION 1 FROM Disk('s3','backups/');

RESTORE TABLE my_table PARTITION 1 FROM Disk('s3', 'backups/')

Query id: ea306c73-83c5-479f-9c0c-391594facc69

┌─id───────────────────────────────────┬─status───┐
│ ec6841a8-0607-465e-bc4d-d446f960d40a │ RESTORED │
└──────────────────────────────────────┴──────────┘

1 row in set. Elapsed: 0.065 sec.

validate the restored data:

ch_minio_s3 :) SELECT
_partition_id AS partition_id,
cityHash64(sum(number)) AS hash,
count() AS count
FROM my_table
GROUP BY partition_id

SELECT
_partition_id AS partition_id,
cityHash64(sum(number)) AS hash,
count() AS count
FROM my_table
GROUP BY partition_id

Query id: a916176d-6a6e-47fc-ba7d-79bb33b152d8

┌─partition_id─┬─────────────────hash─┬──count─┐
111827822647069388611500000
└──────────────┴──────────────────────┴────────┘

1 row in set. Elapsed: 0.012 sec. Processed 500.00 thousand rows, 16.00 MB (41.00 million rows/s., 1.31 GB/s.)
· 2 min read

Question

I'm writing data into ClickHouse cloud and need to be able ,when reading data, to guarantee that I'm getting the latest complete information.

Answer

Talking to same node

If you are using native protocol, or a session to do your write/read, you should then be connected to the same replica: in this scenario you're reading directly from the node where you're writing, then your read will always be consistent.

Talking to a random node

If you can't guarantee you're talking to the same node (for example talking to the node via HTTPS calls which get shuffled via the a load load balancer), you can either:

A)

  1. write your data
  2. connect to a new replica
  3. run SYSTEM SYNC REPLICA db.table_name LIGHTWEIGHT
  4. read the latest data

See SYSTEM commands reference

OR

B) read anytime with sequential consistency

SELECT 
...
SETTINGS select_sequential_consistency = 1

note when using ClickHouse Cloud and its default SharedMergeTree Engine, using insert_quorum_parallel is not required (it's a given)

Using SYSTEM SYNC REPLICAS or select_sequential_consistency will increase the load on ClickHouse Keeper and might have slower performance depending on the load on the service.

The recommended approach is to do the writes/read using the same session or the native protocol (sticky connection).

· 2 min read

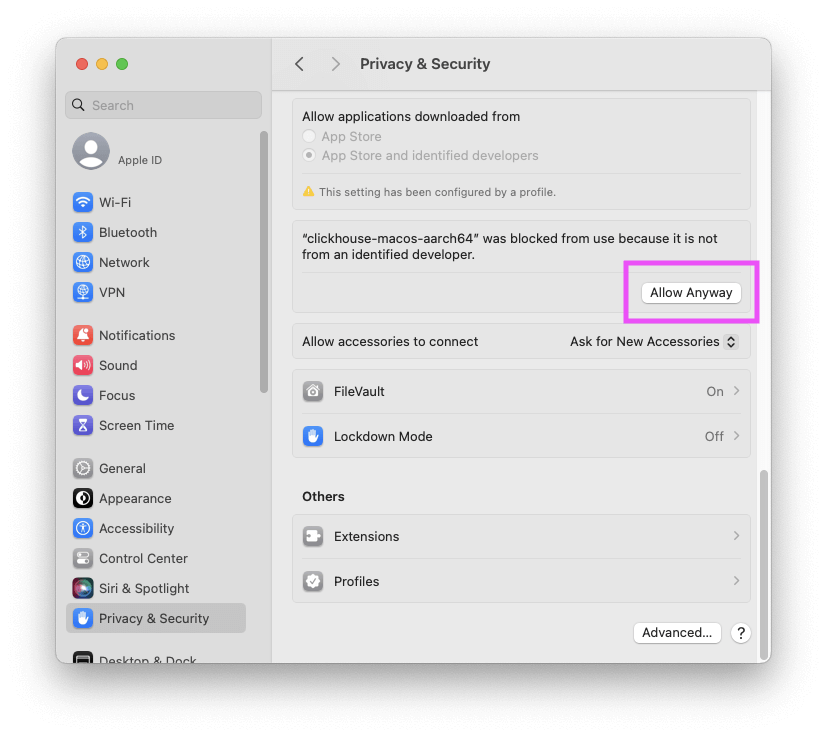
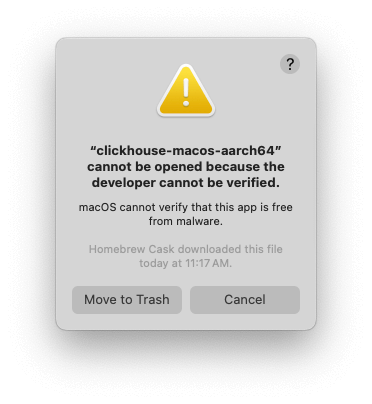
If you install ClickHouse using brew, you may encounter an error from MacOS. By default, MacOS will not run applications or tools created by a developer who cannot be verified. When attempting to run any clickhouse command, you may see this error:

MacOS showing a developer verification error.

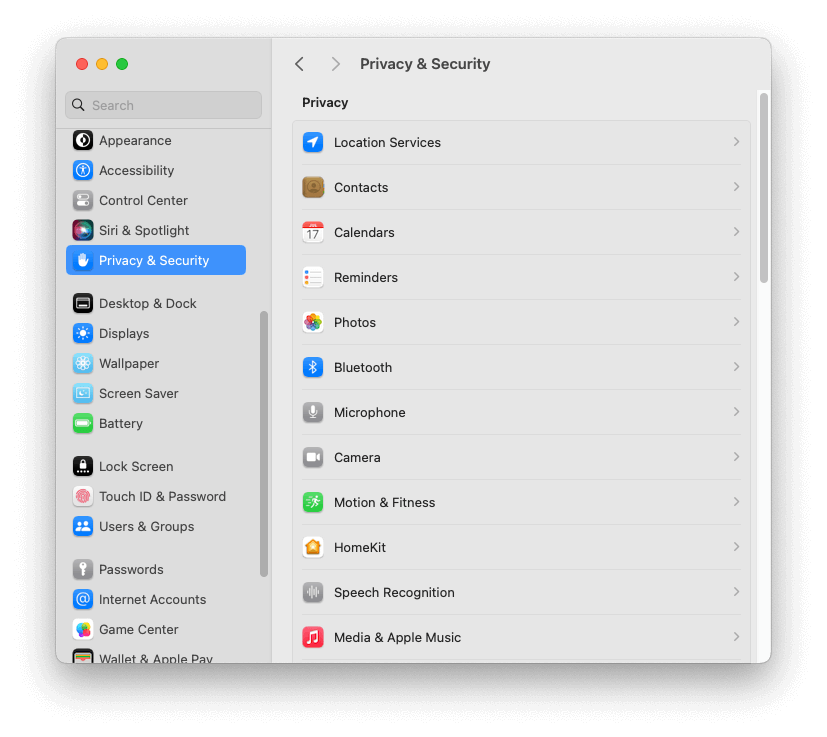
To get around this verification error, you need to remove the app from MacOS' quarintine bin either by finding the appropriate setting in your System Settings window, or using the terminal.

System settings process

The easiest way to remove the clickhouse executable from the quarintine bin is to:

  1. Open System settings.

  2. Navigate to Privacy & Security:

  3. Scroll to the bottom of the window to find a message saying _"clickhouse-macos-aarch64" was blocked from use because it is not from an identified developer".

  4. Click Allow Anyway.

  5. Enter your MacOS user password.

You should now be able to run clickhouse commands in your terminal.

Terminal process

You can perform this process using the command-line:

First find out where Homebrew installed the clickhouse executable:

which clickhouse

This should output something like:

/opt/homebrew/bin/clickhouse

Remove clickhouse from the quarantine bin by running xattr -d com.apple.quarantine following by the path from the previous command:

xattr -d com.apple.quarantine /opt/homebrew/bin/clickhouse

You should now be able to run the clickhouse executable:

clickhouse

This should output something like:

Use one of the following commands:
clickhouse local [args]
clickhouse client [args]
clickhouse benchmark [args]
...

· 2 min read

Here is a basic code snippet filemain.ts.

Package.json (place it under ./):

{
"name": "a simple clickhouse client example",
"version": "1.0.0",
"main": "main.js",
"license": "MIT",
"devDependencies": {
"typescript": "^5.3.2"
},
"dependencies": {
"@clickhouse/client": "^0.2.6"
}
}

Main.ts (place it under ./src):

import { ClickHouseClient, createClient } from '@clickhouse/client'; // or '@clickhouse/client-web'

interface ClickHouseResultSet<T> {
meta: Meta[];
data: T[];
rows: number;
statistics: Statistics;
}

interface Statistics {
elapsed: number;
rows_read: number;
bytes_read: number;
}

interface Meta {
name: string;
type: string;
}

interface Count {
c: number;
}

//Please replace client connection parameters like`host`
//`username`, `passowrd`, `database` as needed.

const initClickHouseClient = async (): Promise<ClickHouseClient> => {
const client = createClient({
host: 'https://FQDN.aws.clickhouse.cloud',
username: 'default',
password: 'password',
database: 'default',
application: `pingpong`,
});

console.log('ClickHouse ping');
if (!(await client.ping())) {
throw new Error('failed to ping clickhouse!');
}
console.log('ClickHouse pong!');
return client;
};

const main = async () => {
console.log('Initialising clickhouse client');
const client = await initClickHouseClient();

const row = await client.query({
query: `SELECT count() AS c FROM system.tables WHERE database='system'`,
});

const jsonRow: ClickHouseResultSet<Count> = await row.json();

console.log(`I have found ${jsonRow.data[0].c} system tables!`);

await client.close();
console.log(`👋`);
};

main();

To install the packages, run yarn from ./:

$ yarn
yarn install v1.22.19
[1/4] 🔍 Resolving packages...
[2/4] 🚚 Fetching packages...
[3/4] 🔗 Linking dependencies...
[4/4] 🔨 Building fresh packages...
✨ Done in 0.14s.

execute the code in main.ts from ./ with:

$ npx ts-node src/main.ts

will output:

Initialising clickhouse client
ClickHouse ping
ClickHouse pong!
I have found 120 system tables!
👋

· 2 min read

Background

If you don't like how clickhouse client displays the prompt in your terminal window, it's possible to change it by creating a single XML file. This article explains how to change the prompt to whatever you want.

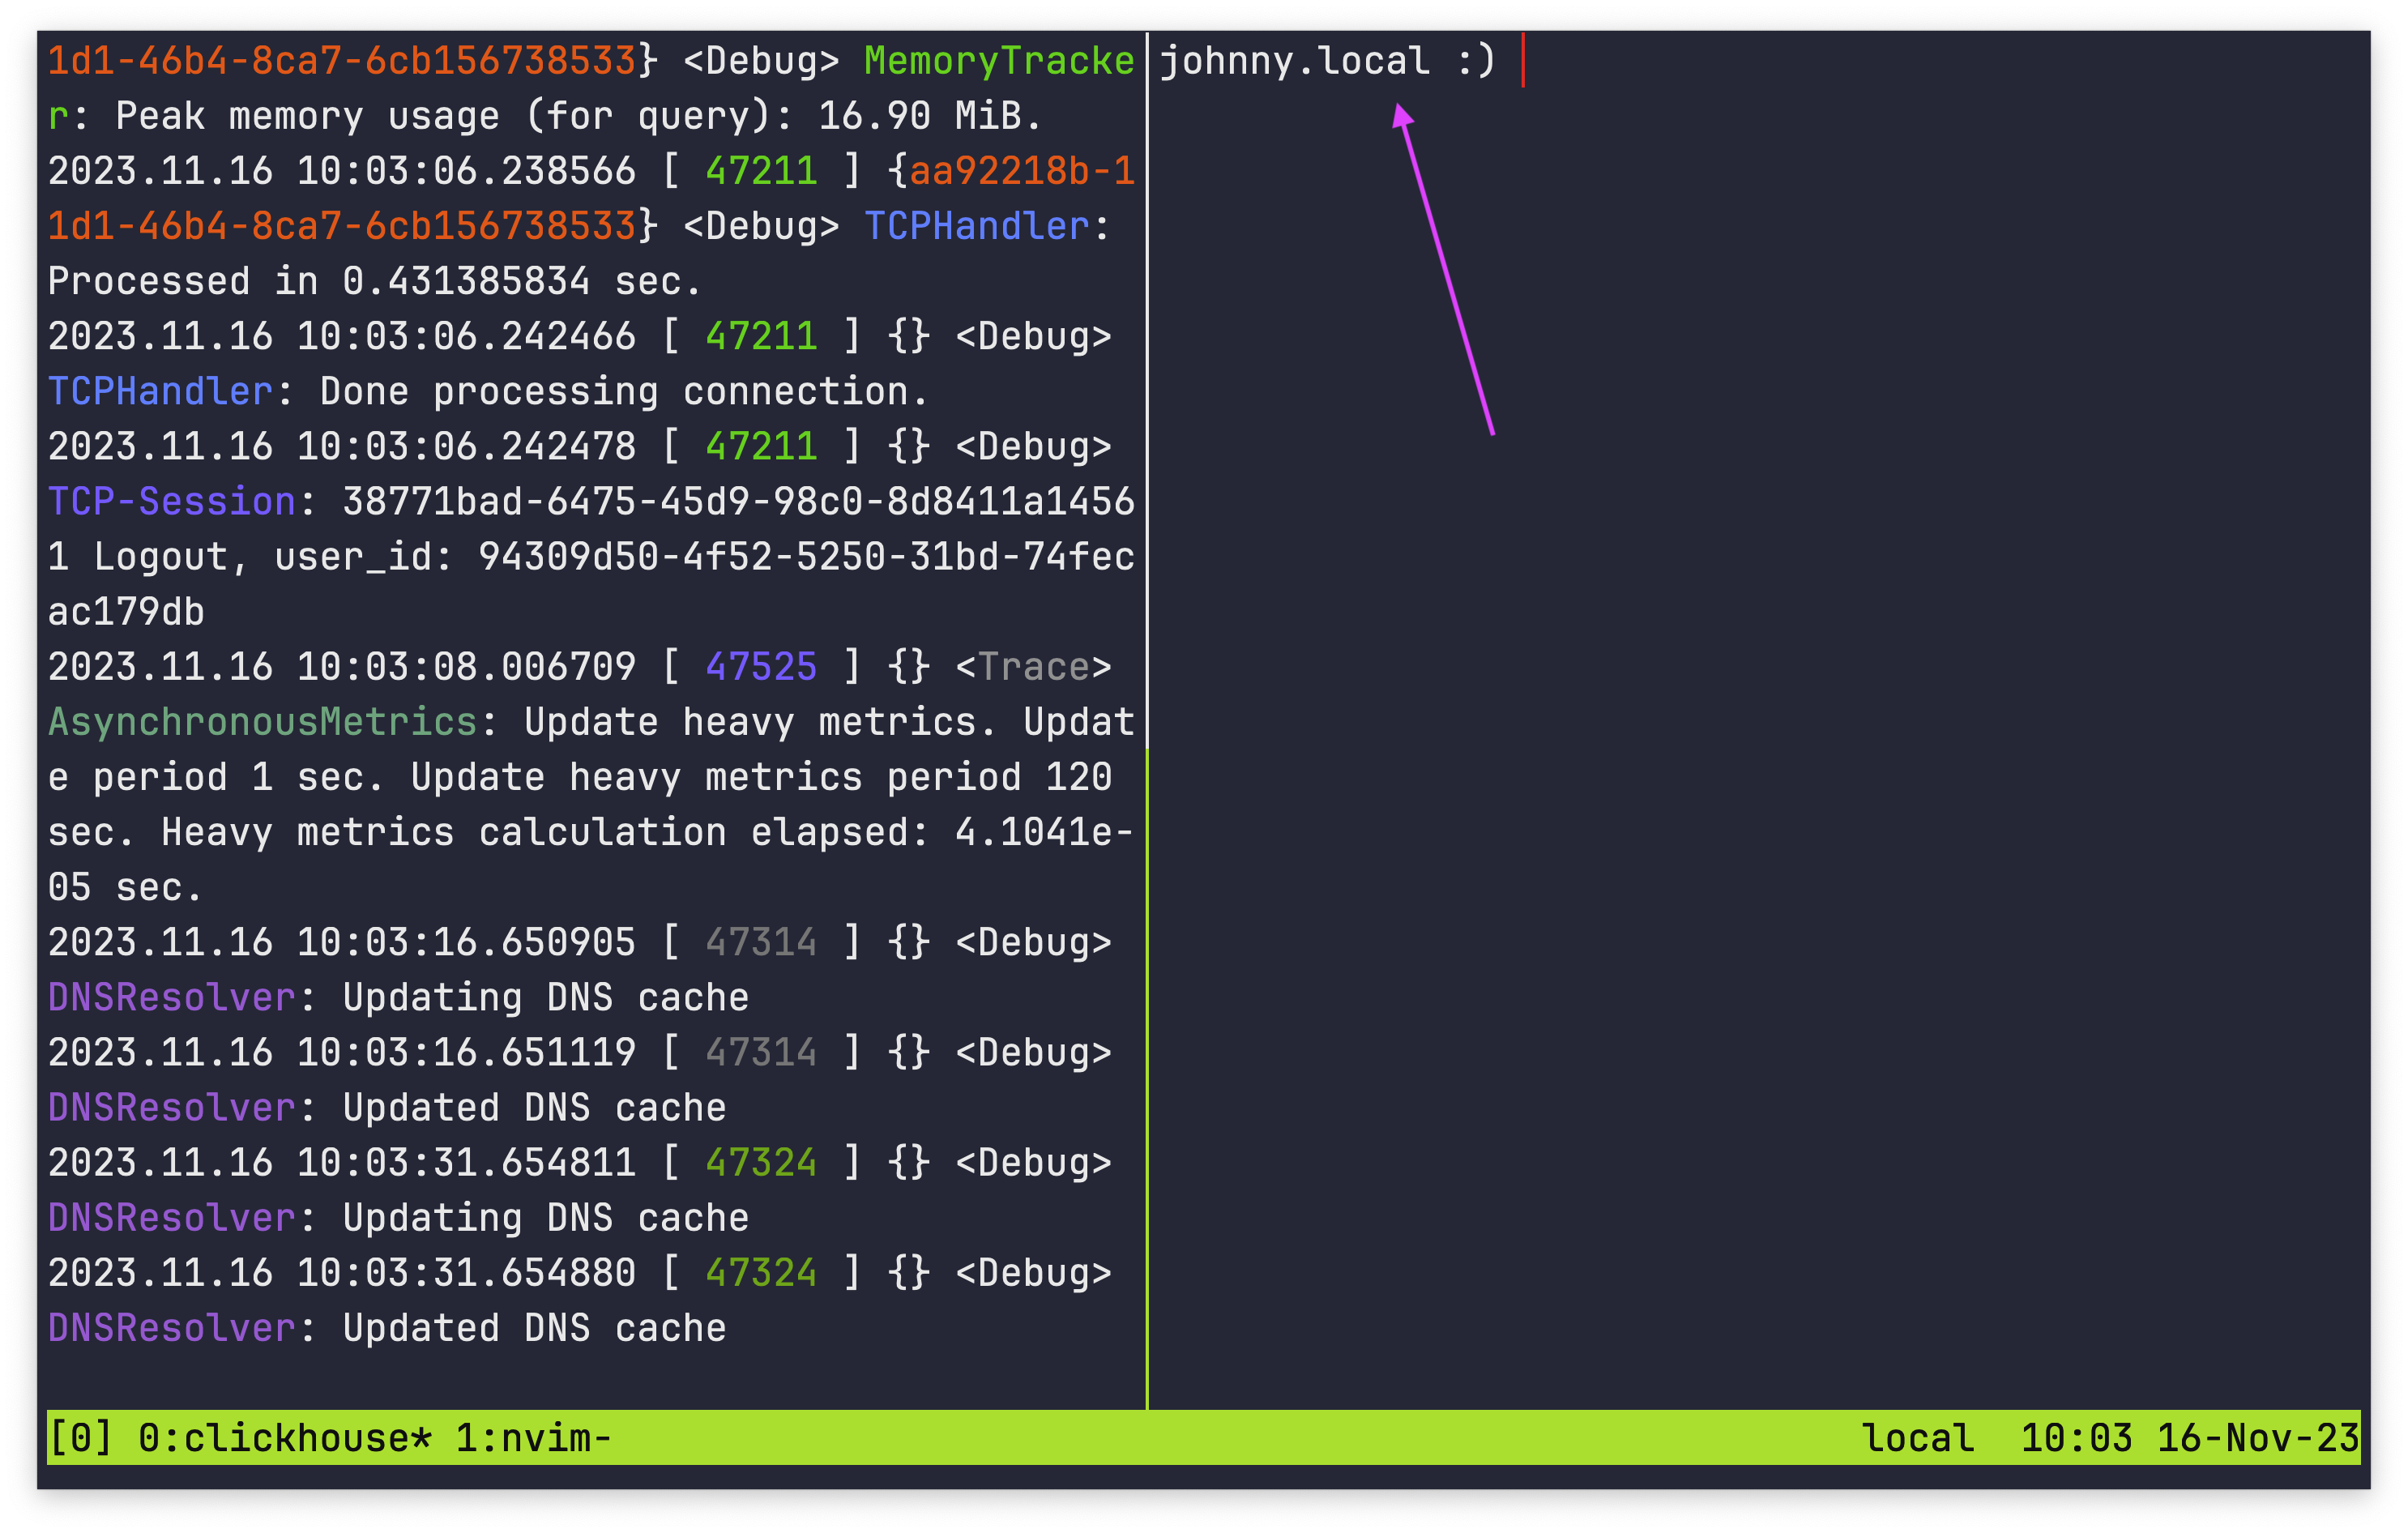
The default prompt is your local computer name followed by :) :

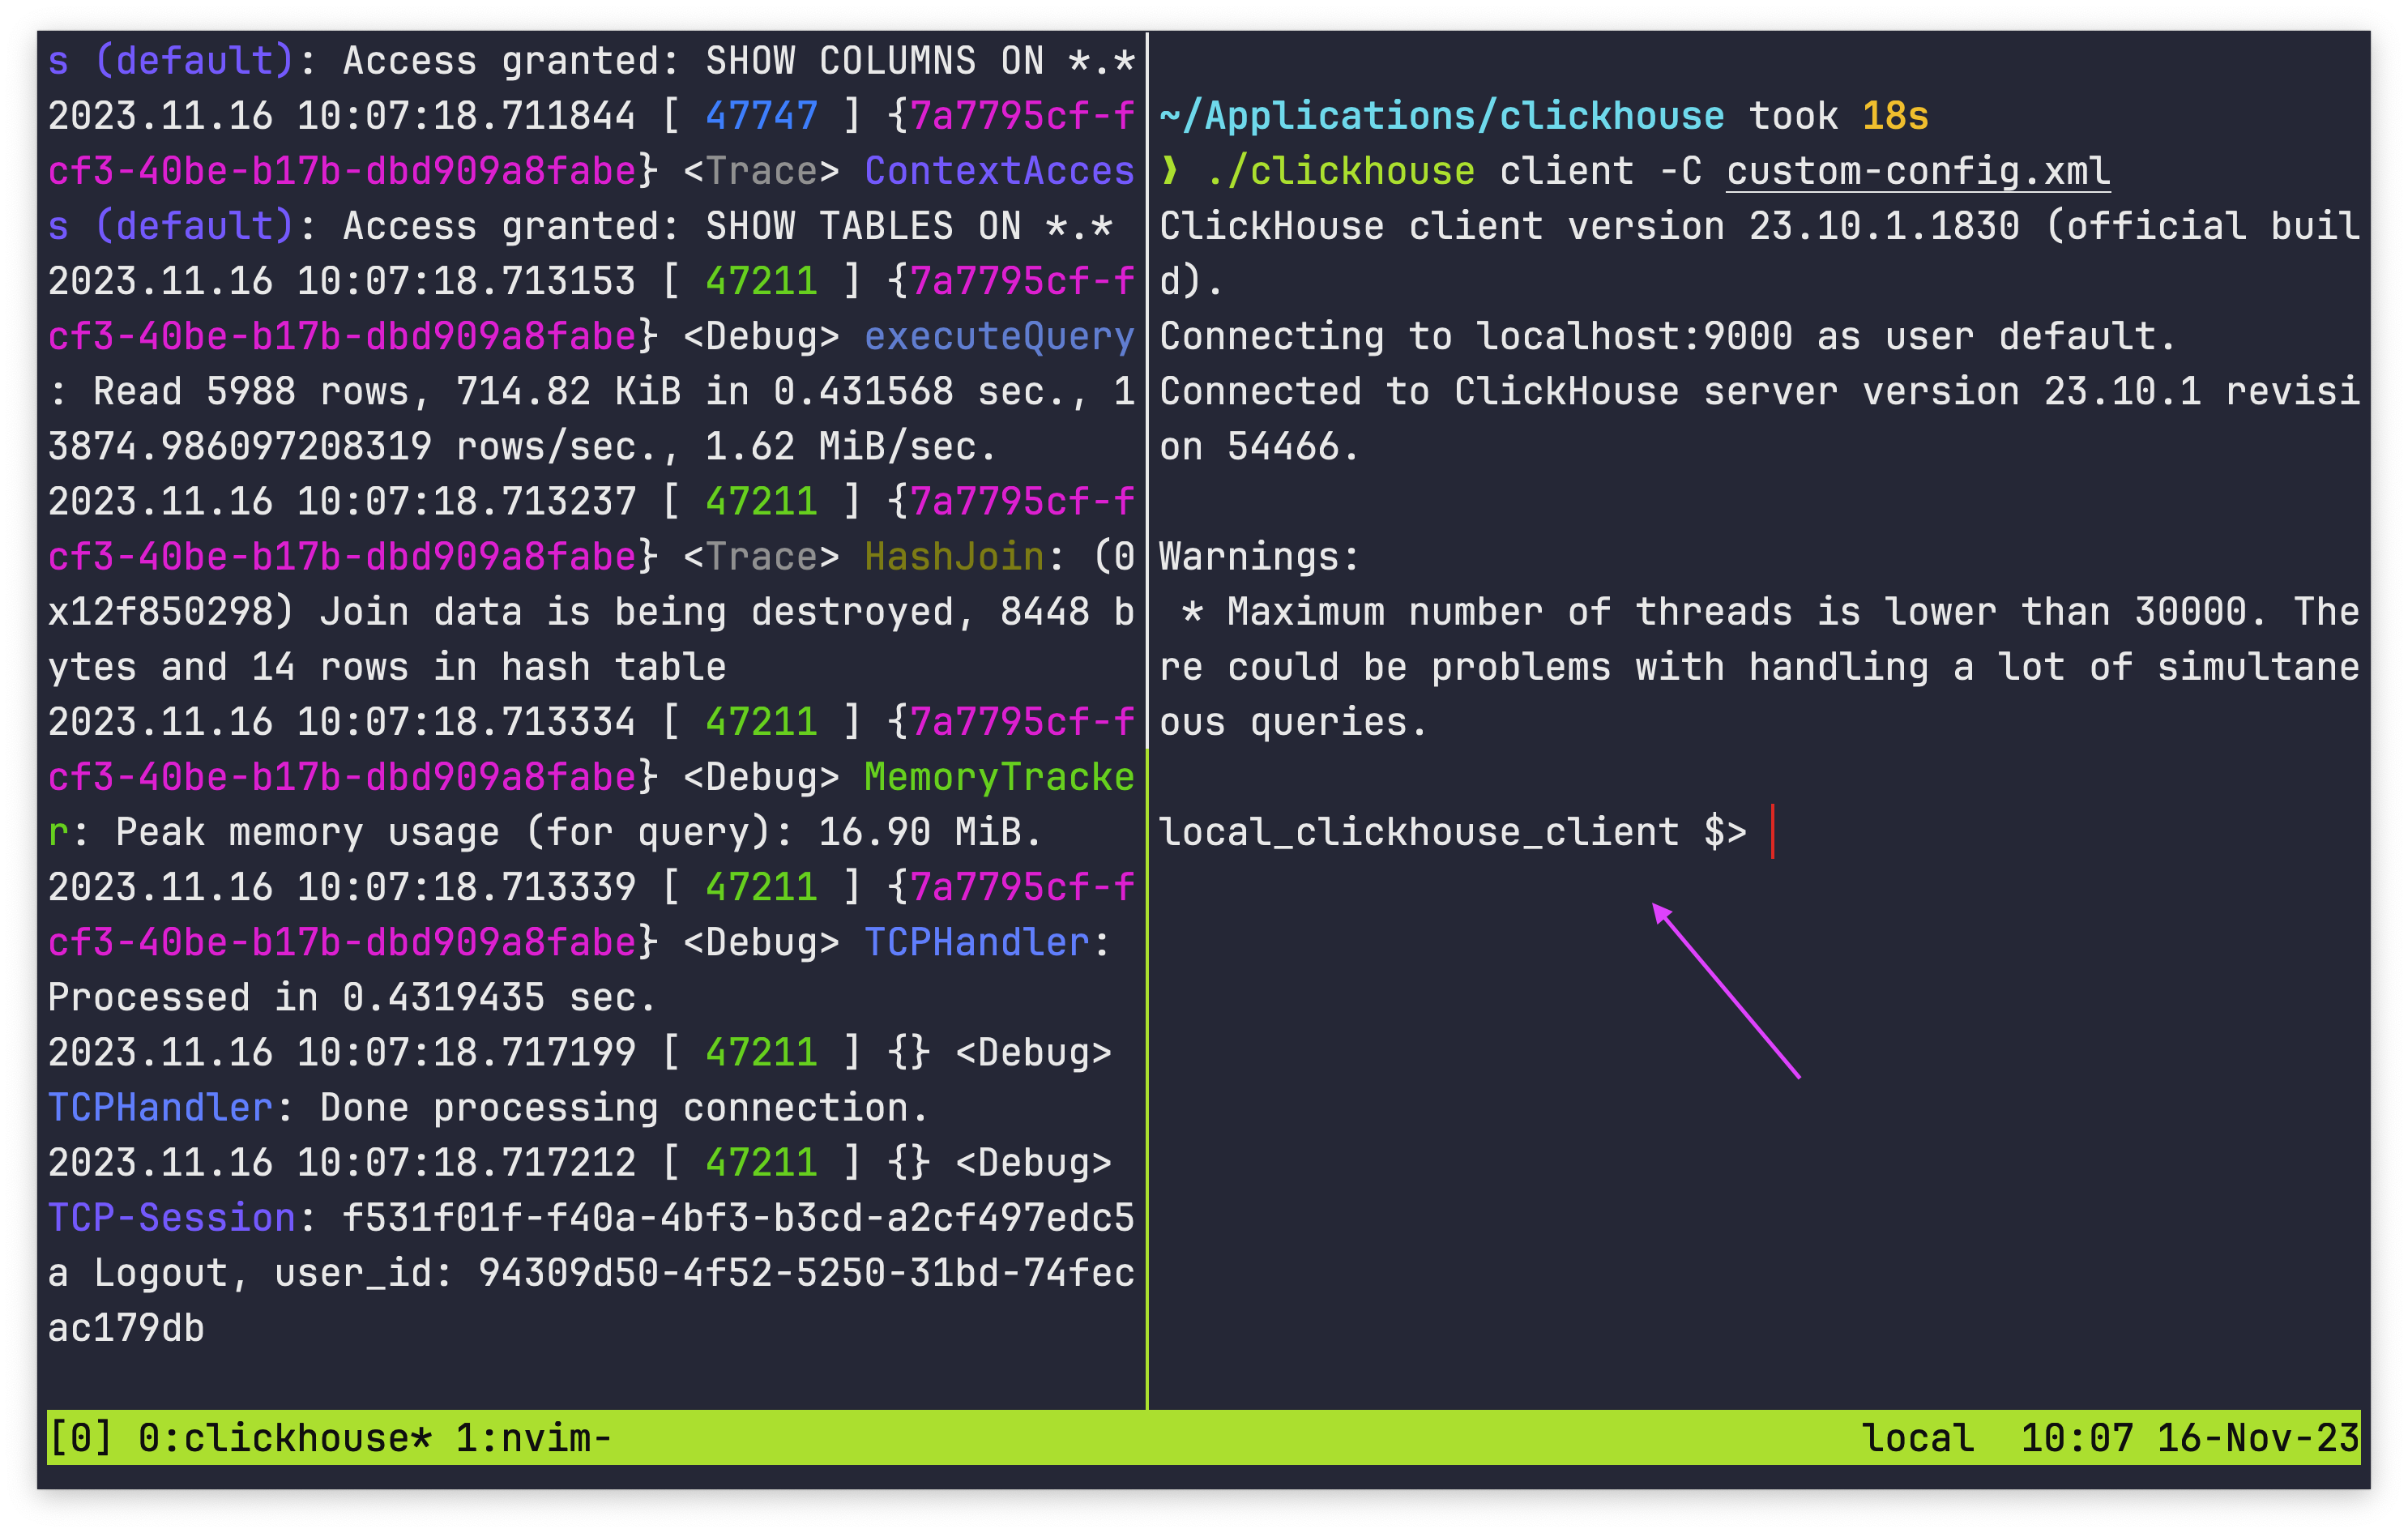
However, you can edit the prompt to be whatever you want:

Steps

To edit the prompt, follow these steps:

  1. Find where you clickhouse executable is stored, and create a file call custom-config.xml in the same directory:

    ./
    ├── clickhouse
    ├── custom-config.xml
    ...
    ├── user_scripts
    └── uuid
  2. Inside custom-config.xml paste the following code:

    <?xml version="1.0" ?>
    <clickhouse>
    <prompt_by_server_display_name>
    <default>CUSTOM_PROMPT_HERE</default>
    </prompt_by_server_display_name>
    </clickhouse>
  3. Replace CUSTOM_PROMPT_HERE with whatever you want your prompt to say. You must keep the prompt to a single line between the opening and closing <default> tags:

    <?xml version="1.0" ?>
    <clickhouse>
    <prompt_by_server_display_name>
    <default>local_clickhouse_client $> </default>
    </prompt_by_server_display_name>
    </clickhouse>
  4. Save the custom-config.xml file.

  5. Start the Clickhouse server if it isn't already running:

    ./clickhouse server
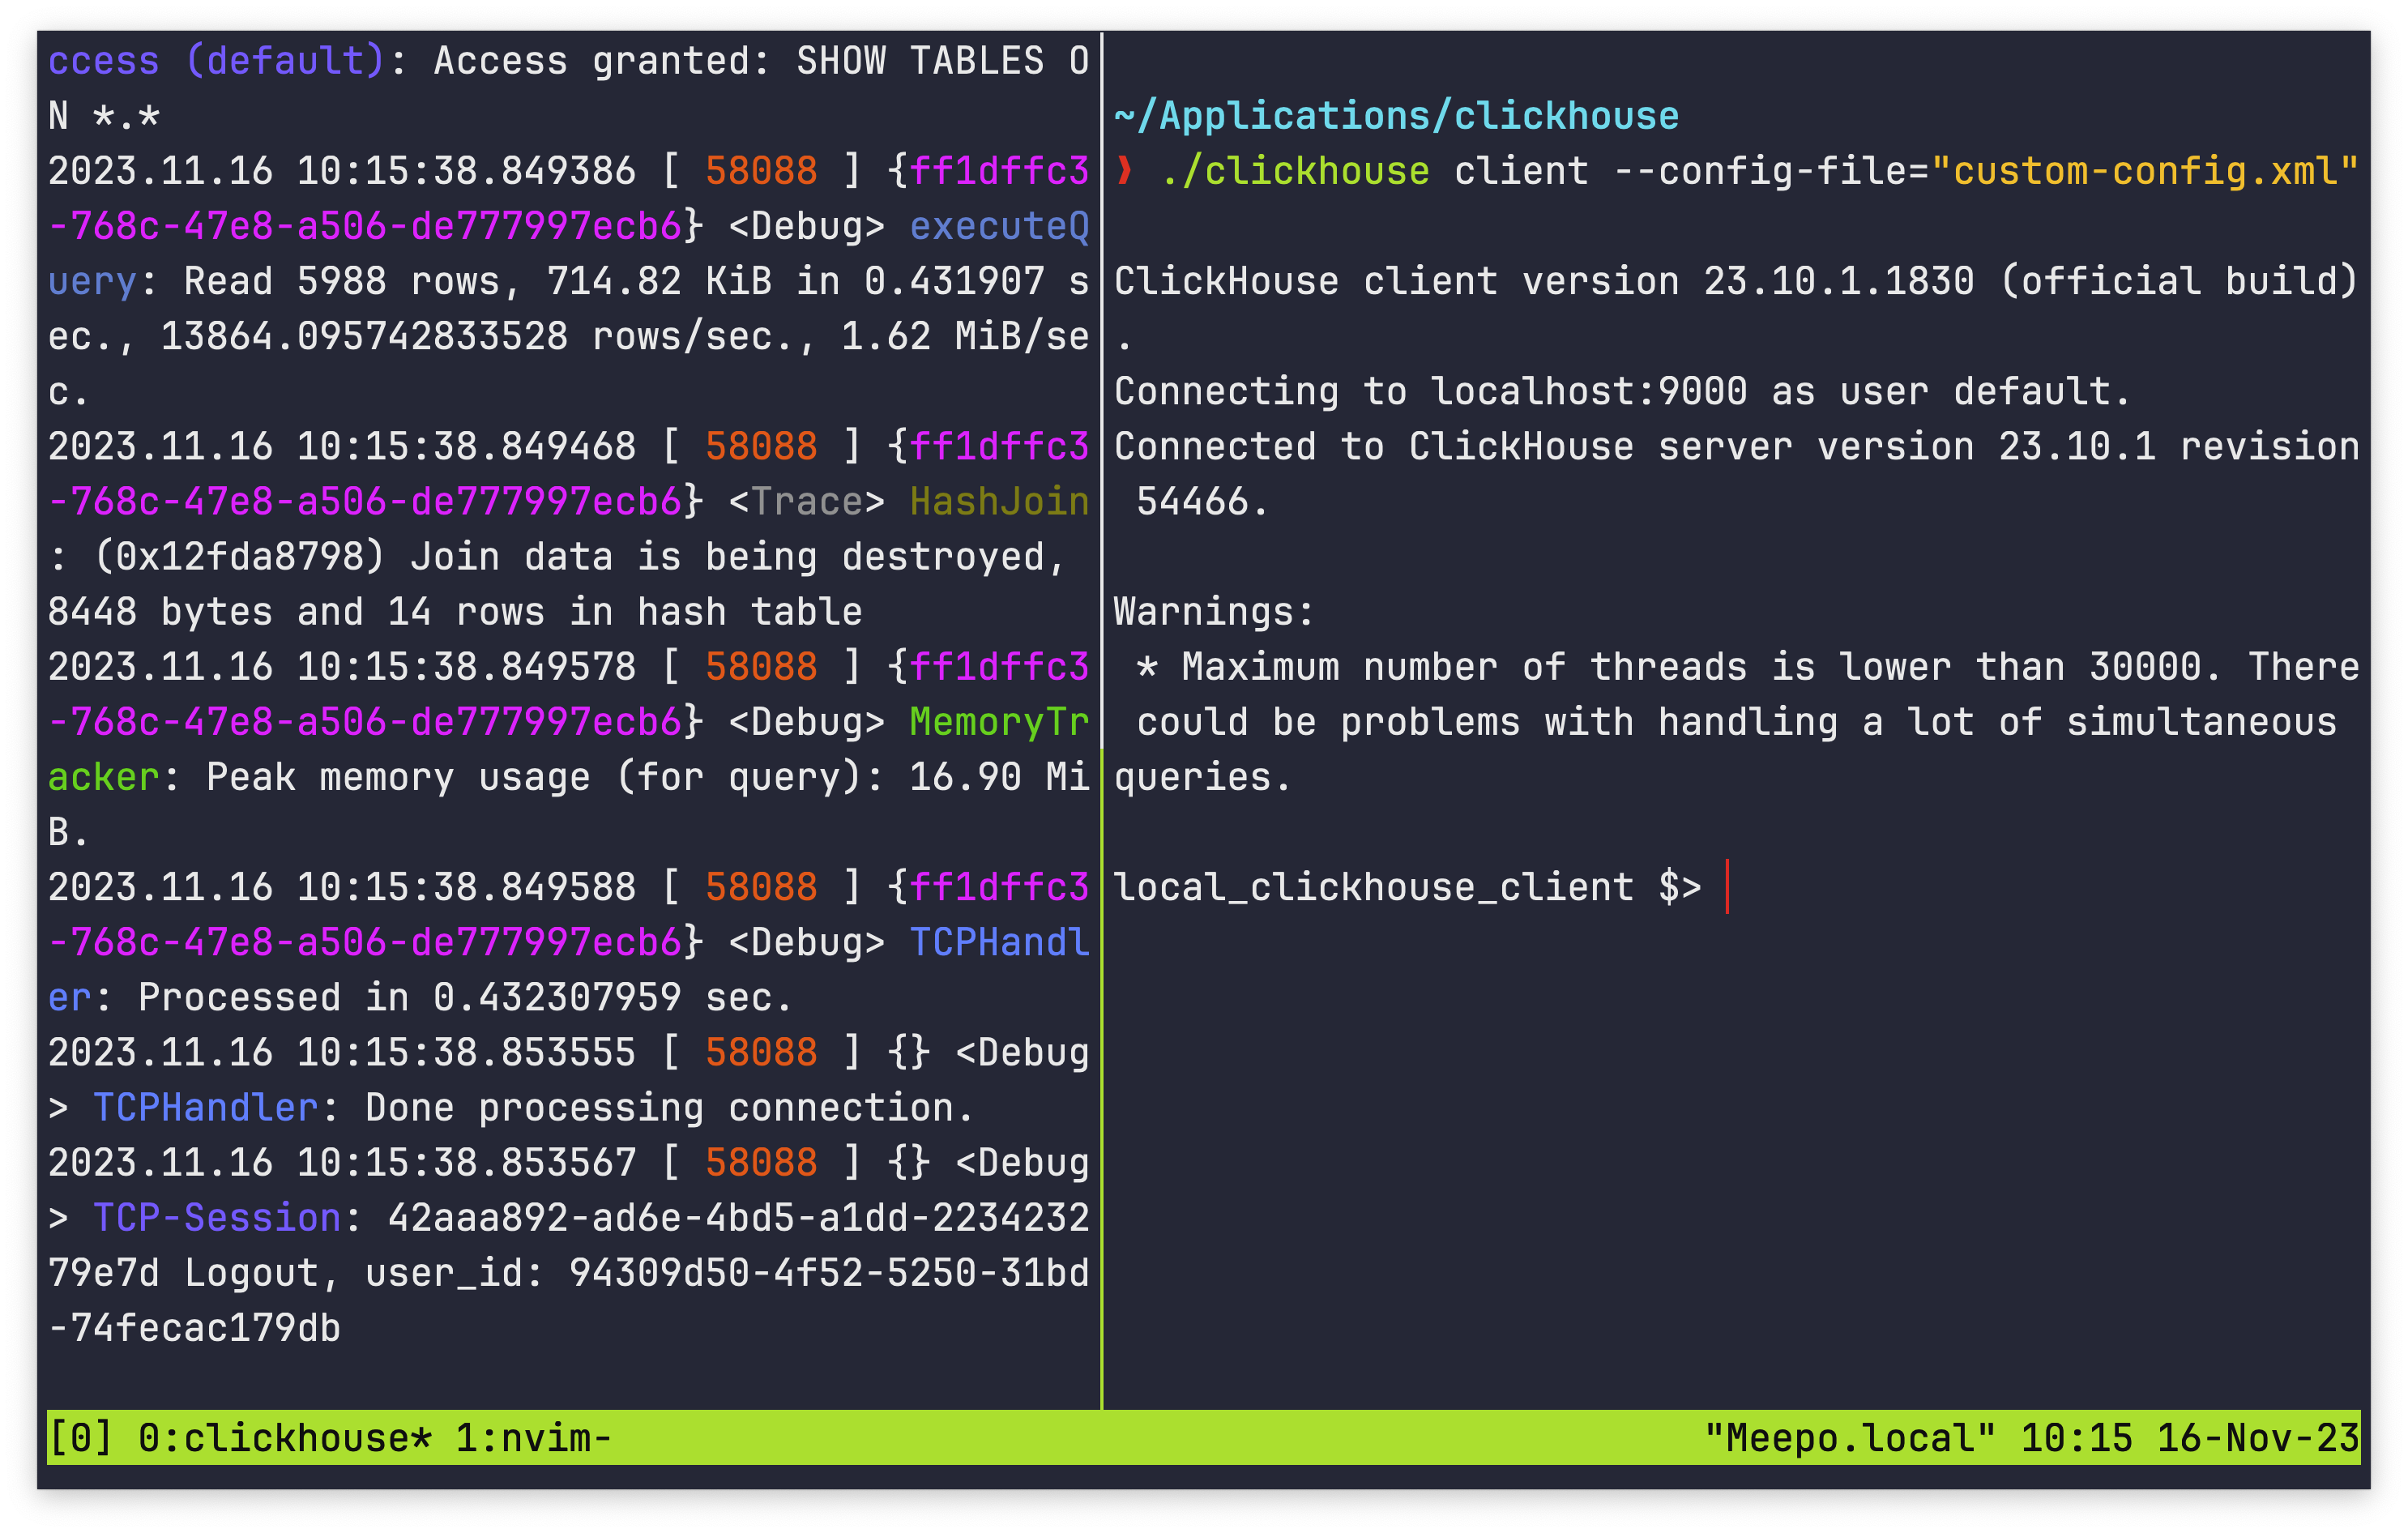
  6. In a new terminal window, start the Clickhouse client with the --config-file=custom-config.xml argument:

    ./clickhouse client --config-file="custom-config.xml"
  7. The Clickhouse client should open and display your custom prompt:

· One min read

How do I check my ClickHouse Cloud Service state? I want to check if the Service is stopped, idle, or running, but I don't want to wake the Service up in doing so.

Answer

The ClickHouse Cloud API is great for checking the status of a cloud service. You need to create an API Key in your service before you can use the Cloud API. You can do this in ClickHouse Cloud clickhouse.cloud:

  1. To check the status of a service, run the following. Make sure to replace Key-ID and Key-Secret with your respective details:

    curl --user '[Key-ID]:[Key-Secret]' https://api.clickhouse.cloud/v1/organizations/[Org-ID]/services/[Service-ID]

    This will output something like:

    result":{"id":"[Service-ID]","name":"[Service-Name]","provider":"aws","region":"us-east-1","state":"**idle**","endpoints":[{"protocol":"nativesecure","host":"[Connect-URL]","port":9440},{"protocol":"https","host":"[Connect-URL]","port":8443}],"tier":"development","idleScaling":true,"idleTimeoutMinutes":15,"ipAccessList":[{"source":"[my-IP]","description":"[my-IP-name]"}],"createdAt":"2023-04-13T23:47:47Z"},"status":200}
  2. You can use the JQ utility to extract the state key:

    curl --user '[Key-ID]:[Key-Secret]' https://api.clickhouse.cloud/v1/organizations/[Org-ID]/services/[Service-ID] | jq '.state'

    This will output something like:

    **idle**
  3. Running the same command against an actively running service will output:

    **running**

· 2 min read

Yes, ClickHouse can perform vector search. The main advantages of using ClickHouse for vector search compared to using more specialized vector databases include:

  • Using ClickHouse's filtering and full-text search capabilities to refine your dataset before performing a search.
  • Performing analytics on your datasets.
  • Running a JOIN against your existing data.
  • No need to manage yet another database and complicate your infrastructure.

Here is a quick tutorial on how to use ClickHouse for vector search.

1. Create embeddings

Your data (documents, images, or structured data) must be converted to embeddings. We recommend creating embeddings using the OpenAI Embeddings API or using the open-source Python library SentenceTransformers.

You can think of an embedding as a large array of floating-point numbers that represent your data. Check out this guide from OpenAI to learn more about embeddings.

2. Store the embeddings

Once you have generated embeddings, you need to store them in ClickHouse. Each embedding should be stored in a separate row and can include metadata for filtering, aggregations, or analytics. Here's an example of a table that can store images with captions:

CREATE TABLE images
(
`_file` LowCardinality(String),
`caption` String,
`image_embedding` Array(Float32)
)
ENGINE = MergeTree;

Let's say you want to search for pictures of dogs in your dataset. You can use a distance function like cosineDistance to take an embedding of a dog image and search for related images:

SELECT
_file,
caption,
cosineDistance(
-- An embedding of your "input" dog picture
[0.5736801028251648, 0.2516217529773712, ..., -0.6825592517852783],
image_embedding
) AS score
FROM images
ORDER BY score ASC
LIMIT 10

This query returns the _file names and caption of the top 10 images most likely to be related to your provided dog image.

Further Reading

To follow a more in-depth tutorial on vector search using ClickHouse, please see:

· 6 min read

Quotas and query complexity are powerful ways to limit and restrict what users can do in ClickHouse.

Quotas do apply restrictions within the context of a time interval, while query complexity applies regardless of time intervals.

This KB article shows examples on how to apply these two different approaches.

The sample data

We refer to this simple sample table for the purpose of these examples:

clickhouse-cloud :) CREATE TABLE default.test_table (name String, age UInt8) ENGINE=MergeTree ORDER BY tuple();

-- CREATE TABLE default.test_table
-- (
-- `name` String,
-- `age` UInt8
-- )
-- ENGINE = MergeTree
-- ORDER BY tuple()

-- Query id: 4fd405db-a96e-4004-b1f6-e7f87def05d7

-- Ok.

-- 0 rows in set. Elapsed: 0.313 sec.

clickhouse-cloud :) INSERT INTO default.test_table SELECT * FROM generateRandom('name String, age UInt8',1,1) LIMIT 100;

-- INSERT INTO default.test_table SELECT *
-- FROM generateRandom('name String, age UInt8', 1, 1)
-- LIMIT 100

-- Query id: 6eccfdc6-d98c-4377-ae25-f18deec6c807

-- Ok.

-- 0 rows in set. Elapsed: 0.055 sec.

clickhouse-cloud :) SELECT * FROM default.test_table_00006488 LIMIT 5

-- SELECT *
-- FROM default.test_table_00006488
-- LIMIT 5

-- Query id: 9fa58419-fb57-4260-886a-ccb836449f58

-- ┌─name─┬─age─┐
-- │ │ 200 │
-- │ 4 │ 72 │
-- │ + │ 127 │
-- │ │ 144 │
-- │ ] │ 60 │
-- └──────┴─────┘

-- 5 rows in set. Elapsed: 0.003 sec.

Using Quotas

In this example we create a role to which we'll apply a Quota that allows only 10 result rows to be retrieved for each 10 seconds interval:

# AS the privileged user

# create a user
clickhouse-cloud :) CREATE USER user_with_quota IDENTIFIED WITH sha256_password BY 'Dr6P1S8SGaQ@u!BUAnv';

-- CREATE USER user_with_quota IDENTIFIED WITH sha256_hash BY '2444E98ADA7433FC12F55C467D3564BF87F47B1A996E70D77496A2F1E42BAD73' SALT '129F92F8AB4AB6E56A01AA826D10D1239F14148606E197EB19D7612F8AF8BC52'

-- Query id: 542a4013-e34c-4776-b374-962fcfd2575a

-- Ok.

-- 0 rows in set. Elapsed: 0.097 sec.

# create a role to which quotas will be applied
clickhouse-cloud :) CREATE ROLE role_with_quota

-- CREATE ROLE role_with_quota

-- Query id: 133a843b-8619-4642-84d9-9c232539b6a0

-- Ok.

-- 0 rows in set. Elapsed: 0.096 sec.


-- grant select privileges
clickhouse-cloud :) GRANT SELECT ON default.* TO role_with_quota;

-- GRANT SELECT ON default.* TO role_with_quota

-- Query id: 1b0e295e-597d-477f-8847-13411157fd1c

-- Ok.

-- 0 rows in set. Elapsed: 0.100 sec.


-- grant role to the user
clickhouse-cloud :) GRANT role_with_quota TO user_with_quota

-- GRANT role_with_quota TO user_with_quota

-- Query id: 0e19ff50-8990-4c17-8f91-5c8ce4142bdd

-- Ok.

-- 0 rows in set. Elapsed: 0.099 sec.


-- create a quota that allows max 10 result rows in each 10 seconds interval and apply that to the role
clickhouse-cloud :) CREATE QUOTA quota_max_10_result_rows_per_10_seconds FOR INTERVAL 10 second MAX result_rows = 10 TO role_with_quota

-- CREATE QUOTA quota_max_10_result_rows_per_10_seconds FOR INTERVAL 10 second MAX result_rows = 10 TO role_with_quota

-- 0 rows in set. Elapsed: 23.427 sec.

-- Query id: fe4d2038-2d35-415d-89ec-9eaaa2533fcd

Now login as the user user_with_quota

-- login as the user where quota is applied through the role
clickhouse-cloud :) SELECT user()

-- SELECT user()

-- Query id: 56ebd28d-0d36-4caf-9cef-c3e51d9f0b9d

-- ┌─currentUser()───┐
-- │ user_with_quota │
-- └─────────────────┘

-- 1 row in set. Elapsed: 0.002 sec.


-- list grants
clickhouse-cloud :) SHOW GRANTS

-- SHOW GRANTS

-- Query id: cc78bada-28f4-4862-9fdf-7e68aae6fd80

-- ┌─GRANTS───────────────────────────────────┐
-- │ GRANT role_with_quota TO user_with_quota │
-- └──────────────────────────────────────────┘

-- 1 row in set. Elapsed: 0.001 sec.

-- check the timem
clickhouse-cloud :) select now()

-- SELECT now()

-- Query id: bbbd54a8-6c2f-4d3b-982a-03d7bd143aa9

-- ┌───────────────now()─┐
-- │ 2023-10-25 14:37:38 │
-- └─────────────────────┘

-- 1 row in set. Elapsed: 0.001 sec.


-- query ten rows
clickhouse-cloud :) SELECT * FROM test_table LIMIT 10

-- SELECT *
-- FROM test_table
-- LIMIT 10

-- Query id: 20f1c02f-c938-4d06-851d-824c82693eb9

-- ┌─name─┬─age─┐
-- │ │ 200 │
-- │ 4 │ 72 │
-- │ + │ 127 │
-- │ │ 144 │
-- │ ] │ 60 │
-- │ │ 137 │
-- │ │ 176 │
-- │ │ 147 │
-- │ │ 107 │
-- │ Q │ 128 │
-- └──────┴─────┘

-- 10 rows in set. Elapsed: 0.002 sec.

-- attempt to get another row within the 10 seconds interval since the last query
clickhouse-cloud :) SELECT * FROM test_table LIMIT 1

-- SELECT *
-- FROM test_table
-- LIMIT 1

-- Query id: 48ae46ef-7b33-4765-affa-e47e889f48e5


-- 0 rows in set. Elapsed: 0.094 sec.

-- Received exception from server (version 23.8.1):
-- Code: 201. DB::Exception: Received from dxqjx1s5lt.eu-west-1.aws.clickhouse.cloud:9440. DB::Exception: Quota for user `user_with_quota` for 10s has been exceeded: result_rows = 11/10.
-- Interval will end at 2023-10-25 14:37:50. Name of quota template: `quota_max_10_result_rows_per_10_seconds`. (QUOTA_EXCEEDED)


-- check the time
clickhouse-cloud :) select now()

-- SELECT now()

-- Query id: 87f190f6-3f75-4fe6-bf9c-c80ed88e179f

-- ┌───────────────now()─┐
-- │ 2023-10-25 14:37:45 │
-- └─────────────────────┘

-- 1 row in set. Elapsed: 0.001 sec.

Note that the user will need to wait another 5 seconds before can get a new 10 rows resultset "allowance".

Using Query Complexity

In this example we create a role to which we'll apply a Query Complexity SETTING that allows only 1 rows to be returned for each query.

-- AS the privileged user
-- create a user
clickhouse-cloud :) CREATE USER user_with_query_complexity IDENTIFIED WITH sha256_password BY 'Dr6P1S8SGaQ@u!BUAnv';

-- CREATE USER user_with_query_complexity IDENTIFIED WITH sha256_hash BY '99AB4976077304554286C43AA47C3BEDA5758EF56282C2FC90C0787DC6FE72BC' SALT '5A50D2B9B1DF7E8A1AA9A2CC00BCF802B7F605281A09E18E237447509B5C7A7C'

-- Query id: 91856182-f2bb-40cc-8902-2786beeeb93d

-- Ok.

-- 0 rows in set. Elapsed: 0.104 sec.


-- create a role with query complexity SETTINGS that allows only one role in resultset
clickhouse-cloud :) CREATE ROLE role_with_query_complexity SETTINGS max_result_rows=1;

-- CREATE ROLE role_with_query_complexity SETTINGS max_result_rows = 1

-- Query id: ec3d89fe-cab8-4cc3-9180-da5c93519643

-- Ok.

-- 0 rows in set. Elapsed: 0.097 sec.


-- grant select privileges
clickhouse-cloud :) GRANT SELECT ON default.* TO role_with_query_complexity;

-- GRANT SELECT ON default.* TO role_with_query_complexity

-- Query id: 230774ad-8073-4e2e-9530-3e90bce41cb1

-- Ok.

-- 0 rows in set. Elapsed: 0.097 sec.


-- grant role to the user
clickhouse-cloud :) GRANT role_with_query_complexity TO user_with_query_complexity

-- GRANT role_with_query_complexity TO user_with_query_complexity

-- Query id: f28c7c7b-61f7-48a8-a281-1f3784764b47

-- Ok.

-- 0 rows in set. Elapsed: 0.096 sec.

Now login as the user user_with_query_complexity:


-- login as the user where query complexity is applied through the role
clickhouse-cloud :) SELECT user();

-- SELECT user()

-- Query id: 196c91fc-abff-464d-acce-6af961c233a3

-- ┌─currentUser()──────────────┐
-- │ user_with_query_complexity │
-- └────────────────────────────┘

-- 1 row in set. Elapsed: 0.001 sec.


-- list grants
clickhouse-cloud :) SHOW GRANTS

-- SHOW GRANTS

-- Query id: 87657b99-c3d9-4ffd-90e8-488f04f7f93b

-- ┌─GRANTS─────────────────────────────────────────────────────────┐
-- │ GRANT role_with_query_complexity TO user_with_query_complexity │
-- └────────────────────────────────────────────────────────────────┘

-- 1 row in set. Elapsed: 0.001 sec.

-- attempt to query with 1 row in resultset
clickhouse-cloud :) SELECT * FROM default.test_table LIMIT 1;

-- SELECT *
-- FROM default.test_table
-- LIMIT 1

-- Query id: 7266891b-8611-4342-81b0-fe04766e62fa

-- ┌─name─┬─age─┐
-- │ │ 200 │
-- └──────┴─────┘

-- 1 row in set. Elapsed: 0.002 sec.


-- attempt to query with more than 1 row in resultset
clickhouse-cloud :) SELECT * FROM default.test_table LIMIT 2;

-- SELECT *
-- FROM default.test_table
-- LIMIT 2

-- Query id: ec8ecff3-f731-45bd-bb27-894ba358c7c8

-- 0 rows in set. Elapsed: 0.091 sec.

--Received exception from server (version 23.8.1):
--Code: 396. DB::Exception: Received from dxqjx1s5lt.eu-west-1.aws.clickhouse.cloud:9440.
--DB::Exception: Limit for result exceeded, max rows: 1.00, current rows: 2.00. (TOO_MANY_ROWS_OR_BYTES)

Whenever attempting to get more than 1 row in resultset the query complexity constraint will kick in.

· One min read

How do I grant the same permissions as the current user to another user?

GRANT CURRENT GRANTS ON *.* TO another_user;

How do I grant a specific permission to a user based on the grants of the current user?

In the below example, another_user will be able to perform SELECT commands on all of the databases and tables of the current user.

GRANT CURRENT GRANTS(SELECT ON *.*) TO another_user;

How do I grant a specific permission to a user for a specific database based on the grants of the current user?

In the below example, another_user will be able to perform INSERT commands to all tables in my_database.

GRANT INSERT ON my_database.* TO another_user;

How do I give access to all grants for a specific user based on the default user?

GRANT default_role TO another_user;

· One min read

Question

How do I change my Billing Contact in ClickHouse Cloud?

Answer

To change the Billing Contact as an Admin, follow the steps below:

  1. Invite a new user as an Admin to the Cloud Organization.
  2. Once they accept the invite, go into the ClickHouse Cloud Console billing page (Admin->Billing) and find the section on "Billing contacts".
  3. Use the Edit button to select the new Admin user as a Billing Contact.